> ## Documentation Index
> Fetch the complete documentation index at: https://auth0.com/llms.txt
> Use this file to discover all available pages before exploring further.
> Learn how to install the Auth0 Single Sign-On (SSO) Dashboard Extension to enable SSO login for your applications.
# Install Single Sign-On Dashboard Extension
1. [Create an SSO Dashboard application](/docs/customize/extensions/single-sign-on-dashboard-extension/create-sso-dashboard-application) in Auth0.
2. Copy the **Client ID** value of your SSO Dashboard application.
Use the Single Sign-On (SSO) Dashboard Extension to manage SSO login for your users on multiple enterprise applications. To learn more, [view this extension on GitHub](https://github.com/auth0-extensions/auth0-sso-dashboard-extension).
## Install extension
You can install the SSO Dashboard extension through the Auth0 Dashboard:
1. Go to [Auth0 Dashboard > Extensions](https://manage.auth0.com/#/extensions), and select **SSO Dashboard** from the list of provided extensions. The **Install Extension** window will open:
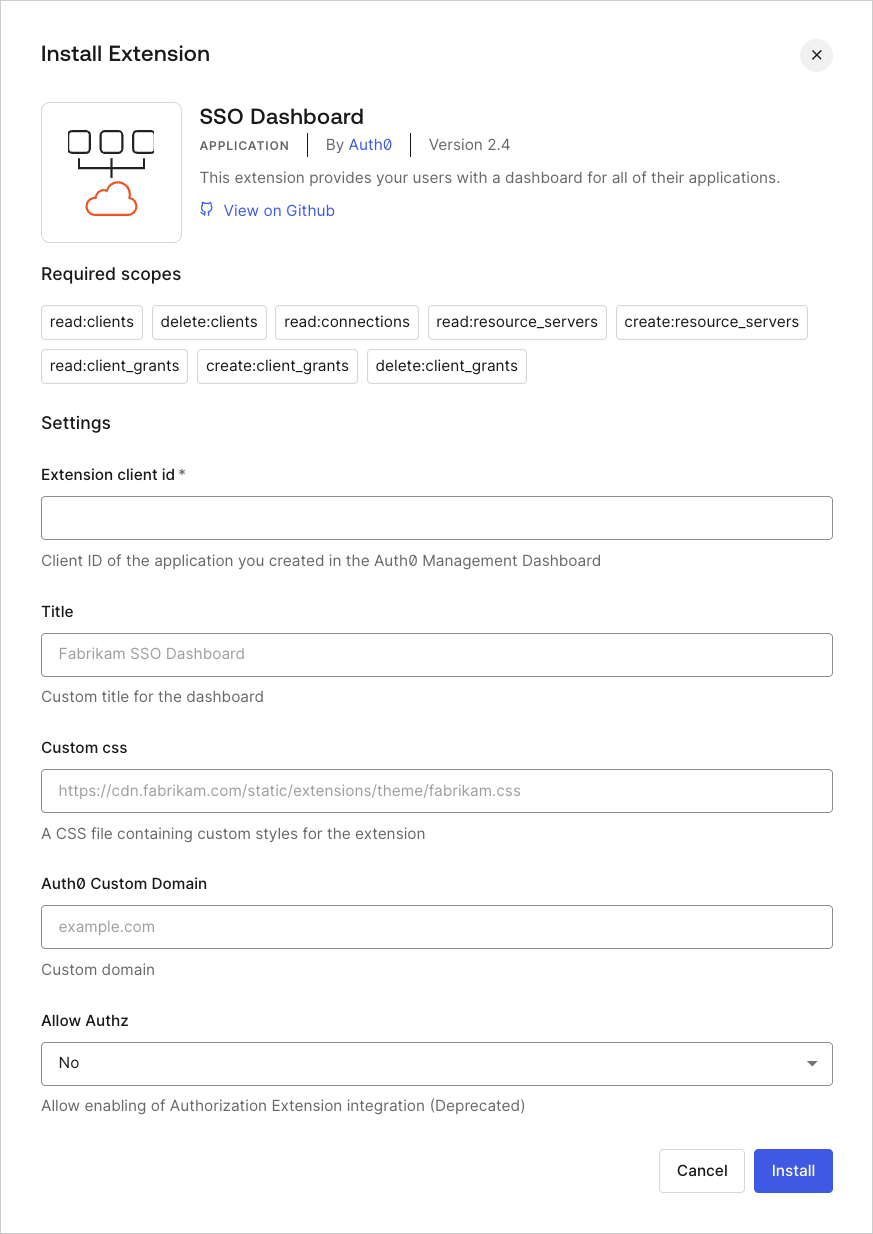 2. Set the following configuration variables:
| Variable | Required | Description |
| --------------------- | -------- | ----------------------------------------------------------------------- |
| `EXTENSION_CLIENT_ID` | Required | **Client ID** of the Auth0 application you created for the extension. |
| `TITLE` | Optional | Custom title that will appear at the top of the SSO Dashboard page. |
| `CUSTOM_CSS` | Optional | Path to a custom CSS file to style the look of your SSO Dashboard page. |
| `FAVICON_PATH` | Optional | Path to a custom favicon. |
| `AUTH0_CUSTOM_DOMAIN` | Optional | [Custom domain](/docs/customize/custom-domains) configured with Auth0. |
Setting the `AUTH0_CUSTOM_DOMAIN` variable does not affect the extension URL, it only changes the URL of the Authorization Endpoint used by the extension. When a custom domain is used, users that log in to the extension will be redirected to `https://{yourAuth0CustomDomain}/login` instead of the default `https://{yourTenant}.{yourRegion}.auth0.com/login`.
3. Select **Install**.
If you navigate to [Auth0 Dashboard > Applications > Applications](https://manage.auth0.com/#/applications), you'll notice that an application named `auth0-sso-dashboard` was created automatically. This application is used by the extension to authorize access to the Management API, and you must not modify it.
## Use extension
1. Go to [Auth0 Dashboard > Extensions](https://manage.auth0.com/#/extensions), and select the **Installed Extensions** view.
2. Select **SSO Dashboard**. When you first select your installed extension, you will be asked to grant it the required permissions. Once you agree, you will be directed to your custom **SSO Dashboard**, which will display the **Title** you provided at the top of the page. If you provided a custom CSS file, that styling will also be applied.
3. To log in to the SSO Dashboard:
1. For **Admins,** use:
`https://{yourTenant}.YOUR_REGION_KEY.webtask.io/auth0-sso-dashboard/admins/login`
2. For **Users,** use:
`https://{yourTenant}.YOUR_REGION_KEY.webtask.io/auth0-sso-dashboard/login`
| Region | Region Domain |
| ------ | -------------- |
| US-1 | us.webtask.io |
| US-3 | us.webtask.run |
| US-4 | us.webtask.run |
| US-5 | us.webtask.run |
| EU | eu.webtask.io |
| EU-2 | eu.webtask.run |
| AU | au.webtask.io |
| JP-1 | jp.webtask.run |
| UK-1 | uk.webtask.run |
| CA-1 | ca.webtask.run |
## Learn more
* [Create Single Sign-on (SSO) Dashboard Application](/docs/customize/extensions/single-sign-on-dashboard-extension/create-sso-dashboard-application)
* [Add Applications to Single Sign-On Dashboard](/docs/customize/extensions/single-sign-on-dashboard-extension/add-applications-to-the-sso-dashboard)
* [Update Applications in the SSO Dashboard](/docs/customize/extensions/single-sign-on-dashboard-extension/update-applications-on-the-sso-dashboard)
* [Configure Session Lifetime Settings](/docs/manage-users/sessions/configure-session-lifetime-settings)
* [Logout](/docs/authenticate/login/logout)
2. Set the following configuration variables:
| Variable | Required | Description |
| --------------------- | -------- | ----------------------------------------------------------------------- |
| `EXTENSION_CLIENT_ID` | Required | **Client ID** of the Auth0 application you created for the extension. |
| `TITLE` | Optional | Custom title that will appear at the top of the SSO Dashboard page. |
| `CUSTOM_CSS` | Optional | Path to a custom CSS file to style the look of your SSO Dashboard page. |
| `FAVICON_PATH` | Optional | Path to a custom favicon. |
| `AUTH0_CUSTOM_DOMAIN` | Optional | [Custom domain](/docs/customize/custom-domains) configured with Auth0. |
Setting the `AUTH0_CUSTOM_DOMAIN` variable does not affect the extension URL, it only changes the URL of the Authorization Endpoint used by the extension. When a custom domain is used, users that log in to the extension will be redirected to `https://{yourAuth0CustomDomain}/login` instead of the default `https://{yourTenant}.{yourRegion}.auth0.com/login`.
3. Select **Install**.
If you navigate to [Auth0 Dashboard > Applications > Applications](https://manage.auth0.com/#/applications), you'll notice that an application named `auth0-sso-dashboard` was created automatically. This application is used by the extension to authorize access to the Management API, and you must not modify it.
## Use extension
1. Go to [Auth0 Dashboard > Extensions](https://manage.auth0.com/#/extensions), and select the **Installed Extensions** view.
2. Select **SSO Dashboard**. When you first select your installed extension, you will be asked to grant it the required permissions. Once you agree, you will be directed to your custom **SSO Dashboard**, which will display the **Title** you provided at the top of the page. If you provided a custom CSS file, that styling will also be applied.
3. To log in to the SSO Dashboard:
1. For **Admins,** use:
`https://{yourTenant}.YOUR_REGION_KEY.webtask.io/auth0-sso-dashboard/admins/login`
2. For **Users,** use:
`https://{yourTenant}.YOUR_REGION_KEY.webtask.io/auth0-sso-dashboard/login`
| Region | Region Domain |
| ------ | -------------- |
| US-1 | us.webtask.io |
| US-3 | us.webtask.run |
| US-4 | us.webtask.run |
| US-5 | us.webtask.run |
| EU | eu.webtask.io |
| EU-2 | eu.webtask.run |
| AU | au.webtask.io |
| JP-1 | jp.webtask.run |
| UK-1 | uk.webtask.run |
| CA-1 | ca.webtask.run |
## Learn more
* [Create Single Sign-on (SSO) Dashboard Application](/docs/customize/extensions/single-sign-on-dashboard-extension/create-sso-dashboard-application)
* [Add Applications to Single Sign-On Dashboard](/docs/customize/extensions/single-sign-on-dashboard-extension/add-applications-to-the-sso-dashboard)
* [Update Applications in the SSO Dashboard](/docs/customize/extensions/single-sign-on-dashboard-extension/update-applications-on-the-sso-dashboard)
* [Configure Session Lifetime Settings](/docs/manage-users/sessions/configure-session-lifetime-settings)
* [Logout](/docs/authenticate/login/logout)