> ## Documentation Index
> Fetch the complete documentation index at: https://auth0.com/llms.txt
> Use this file to discover all available pages before exploring further.
> Step 1 of Amazon API Gateway Tutorial
# AWS API Gateway Tutorial Step 1
This feature uses delegation. By default, delegation is disabled for tenants without an add-on in use as of 8 June 2017. Legacy tenants who currently use an add-on that requires delegation may continue to use this feature. If delegation functionality is changed or removed from service at some point, customers who currently use it will be notified beforehand and given ample time to migrate. In addition, note that delegation does not support the use of custom domains so any features depending on it may not be fully functional alongside a custom domain.
## Step 1 - Set up the Amazon API Gateway
After completing this step, you will have:
* Set up Amazon API Gateway using AWS Lambda functions to execute your service logic that stores and retrieves pets from an Amazon DynamoDB table;
* Created two unauthenticated REST service methods for getting and updating a list of pets.
Prior to beginning, please have [Node.js](https://nodejs.org/) installed.
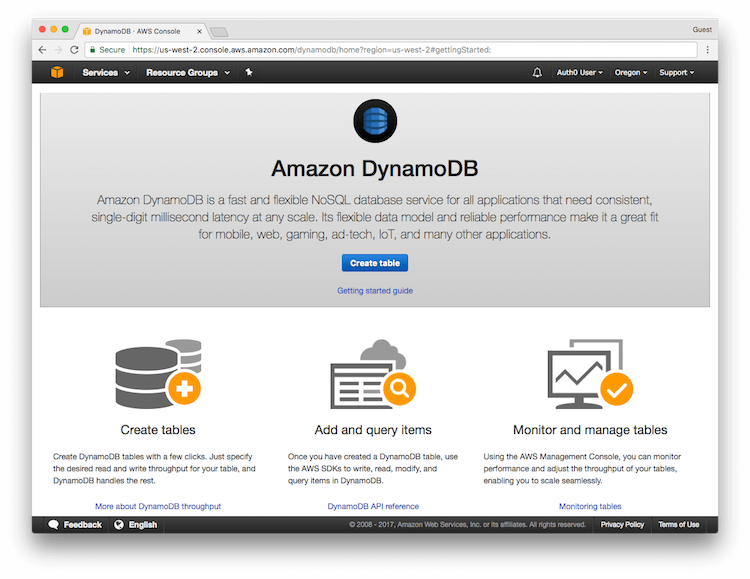
### Step 1. Create the Amazon DynamoDB Table
In the [Amazon DynamoDB Console](https://console.aws.amazon.com/dynamodb), click on **Create Table**.
 Configure the variables associated with the table:
* **Table name**: Pets
* **Primary key**: username
* **Primary key type**: String
* **Use default settings**: unchecked
* **Read capacity units**: 3
* **Write capacity units**: 3
Configure the variables associated with the table:
* **Table name**: Pets
* **Primary key**: username
* **Primary key type**: String
* **Use default settings**: unchecked
* **Read capacity units**: 3
* **Write capacity units**: 3
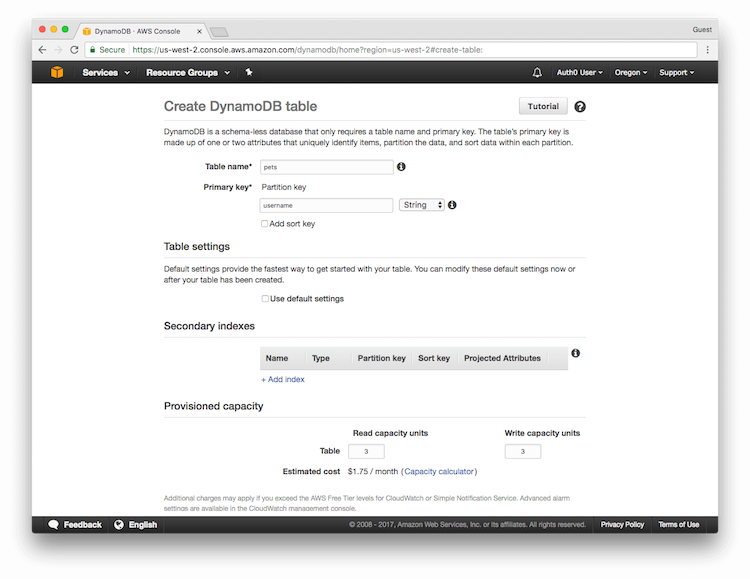 Click **Create** to create the table with your provided settings.
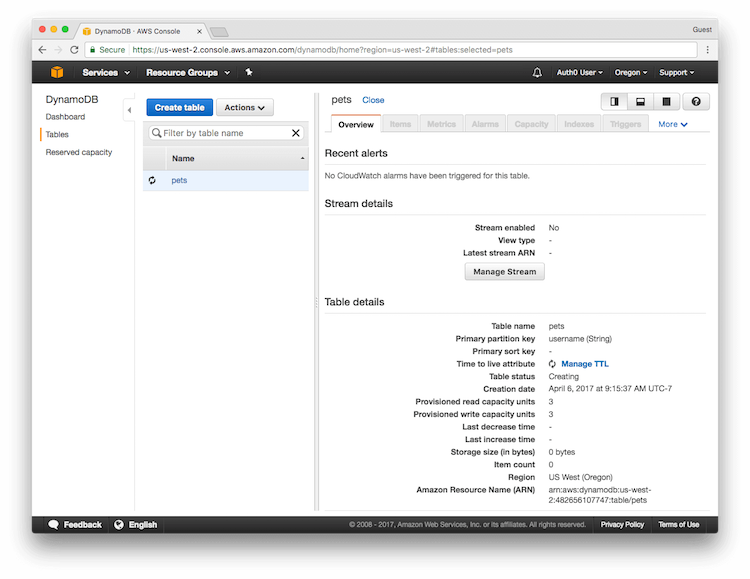
While the table is being created, take note of the Amazon Resource Name (ARN) under the Table details section. You will need the table's ARN in the next step.
Click **Create** to create the table with your provided settings.
While the table is being created, take note of the Amazon Resource Name (ARN) under the Table details section. You will need the table's ARN in the next step.
 ### Step 2. Create the Policy that Grants AWS Lambda Functions Access to the DynamoDB Pets Table
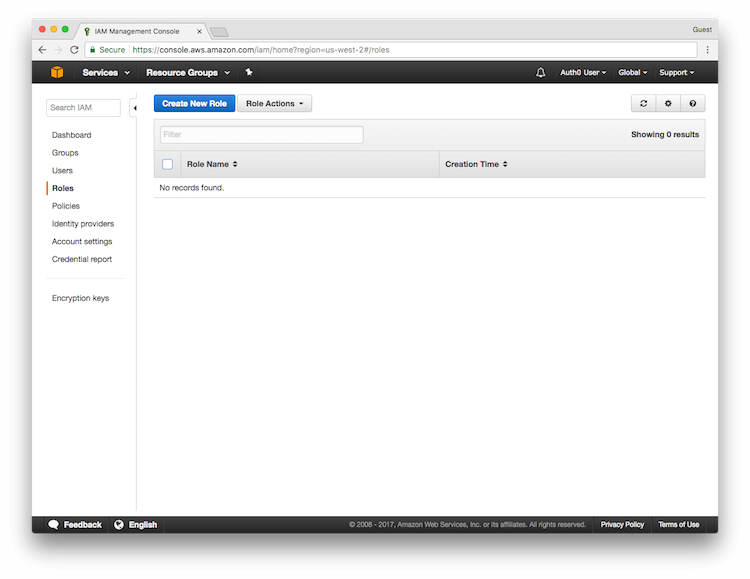
Navigate to the [AWS IAM Console](https://console.aws.amazon.com/iam).
Click on **Roles** in the left menu, and then click the **Create New Role** button.
### Step 2. Create the Policy that Grants AWS Lambda Functions Access to the DynamoDB Pets Table
Navigate to the [AWS IAM Console](https://console.aws.amazon.com/iam).
Click on **Roles** in the left menu, and then click the **Create New Role** button.
 Name the role `APIGatewayLambdaExecRole` and click **Next Step**.
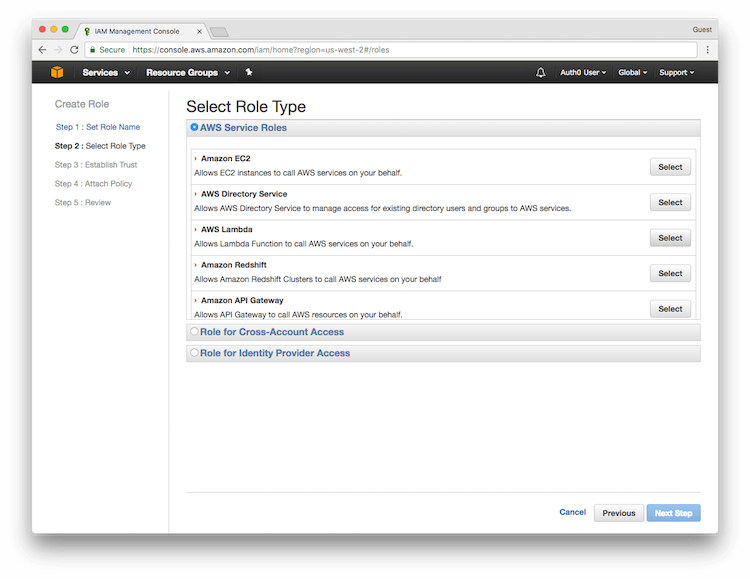
Select the Role Type. Under AWS Service Roles, select AWS Lambda.
Name the role `APIGatewayLambdaExecRole` and click **Next Step**.
Select the Role Type. Under AWS Service Roles, select AWS Lambda.
 On the Attach Policy screen, skip this step by clicking **Next Step**. At this point, review the information you provided. If all looks correct, click **Create Role**. When finished, you should see your role listed on the IAM homepage.
Select the role you just created, **APIGatewayLambdaExecRole**. Click the down arrow for Inline Policies and click the **Click Here** link.
Select Custom Policy, and then click **Select**. Name the policy `LogAndDynamoDBAccess` and add the following code as the policy document (be sure to first update the Amazon Resource Name (ARN) for your DynamoDB table). Click **Apply Policy**.
```json lines theme={null}
{
"Version": "2012-10-17",
"Statement": [
{
"Sid": "AccessCloudwatchLogs",
"Action": ["logs:*"],
"Effect": "Allow",
"Resource": "arn:aws:logs:*:*:*"
},
{
"Sid": "PetsDynamoDBReadWrite",
"Effect": "Allow",
"Action": [
"dynamodb:DeleteItem",
"dynamodb:GetItem",
"dynamodb:PutItem",
"dynamodb:UpdateItem"
],
"Resource": ["DYNAMODB_TABLE_ARN_VALUE_FROM_PREVIOUS_STEP"]
}
]
}
```
### Step 2. Create the AWS Lambda Functions
The next three steps create the AWS Lambda functions for retrieving and updating pet information in the DynamoDB table.
#### Create the Lambda Function for GetPetInfo
In the [AWS Lambda Console](https://console.aws.amazon.com/lambda), select **Create a Lambda Function** (if you have not created an AWS Lambda function before, you will click **Get Started Now**).
On the Select blueprint screen, click **Blank Function**.
You will then be prompted to Configure triggers. Click **Next** to proceed. You do not have to do so at this point.
Finally, you will be asked to Configure function.
Populate the appropriate fields with the following information:
* **Name**: `GetPetInfo`
* **Runtime**: Node.js 6.10
Paste the following code to read pet information from the DynamoDB table into the **Lambda function code** area.
```javascript lines theme={null}
var AWS = require('aws-sdk');
var DOC = require('dynamodb-doc');
var dynamo = new DOC.DynamoDB();
exports.handler = function(event, context) {
var cb = function(err, data) {
if(err) {
console.log('error on GetPetsInfo: ',err);
context.done('Unable to retrieve pet information', null);
} else {
if(data.Item && data.Item.pets) {
context.done(null, data.Item.pets);
} else {
context.done(null, {});
}
}
};
dynamo.getItem({TableName:"Pets", Key:{username:"default"}}, cb);
};
```
For Role, select **Choose an existing role**. Next, choose **APIGatewayLambdaExecRole** as the Existing Role. Leave all other settings at their default values.
Click **Next** to review the information you provided. If all looks correct, click **Create function**.
Click **Test**, leaving the Input test event at its default (which uses the Hello World template). When the test completes, you should see an empty output (`{}`) in the Execution Result section. The table is empty.
#### Create the Lambda Function for UpdatePetInfo
Repeat the instructions used to create the `GetPetInfo` function, but use the following instead as the function code:
```javascript lines theme={null}
var AWS = require('aws-sdk');
var DOC = require('dynamodb-doc');
var dynamo = new DOC.DynamoDB();
exports.handler = function(event, context) {
var item = { username:"default",
pets: event.pets || {}
};
var cb = function(err, data) {
if(err) {
console.log(err);
context.fail('unable to update pets at this time');
} else {
console.log(data);
context.done(null, data);
}
};
dynamo.putItem({TableName:"Pets", Item:item}, cb);
};
```
Test the function by clicking the Actions drop-down and choosing **Configure sample event**. Enter the following for sample data and click **Submit**:
```json lines theme={null}
{
"pets": [{
"id": 1,
"type": "dog",
"price": 249.99
}]
}
```
You should see an empty return result (`{}`).
Return to your `GetPetInfo` Lambda function and click **Test** again. You should now see a single pet.
#### Create the Third Lambda Function
You will create one additional Lambda function. While this function will do nothing, it is required by the OPTIONS method for CORS as described in a later section.
Using the steps described above, create a Lambda function named `NoOp`. The function's code will be as follows:
```js lines theme={null}
exports.handler = function(event, context) {
context.succeed('');
}
```
Instead of creating this third Lambda function, you may choose to [create an OPTIONS method](#method-options) on the API Gateway.
### Step 3. Create the Amazon API Gateway API
You will create an API with two methods: one will `GET` pet information, and one will `POST` pet information.
#### Method: GET Pet Information
Go to the [Amazon API Gateway Console](https://console.aws.amazon.com/apigateway), and click **Create API**. If this is the first time you are creating an API, you will see a screen prompting you to **Get Started** instead.
If this is the first time you are creating an API, you will be prompted to create an Example API. Click **OK** to exit the pop-up notification, and choose the **New API** radio button instead of the **Example API** button.
Name the API `SecurePets` and click **Create API**.
Navigate to the Resources tab of the `SecurePets` API and click the **Create Resource** action.
Name the resource `Pets` and click **Create Resource** again.
In the left pane, select `/pets` and then click the **CreateMethod** button.
In the drop-down, select GET and click the checkmark button. Provide the following configuration values for the `GET` method:
* **Integration type**: Lambda Function;
* **Lambda Region**: Region you are located in;
* **Lambda Function**: GetPetInfo.
Click **Save** and then **OK** when prompted in the popup to grant permissions to the Lambda function.
In the Method Execution window that appears next, click **Test**.
You should see the single pet returned in the response body.
#### Method: POST Pet Information
Creating the API used to `POST` pet information is similar to creating the one used to `GET` pet information.
In the left pane, select `/pets`, and click **CreateMethod**.
In the drop-down, select POST, and click the checkmark button.
Select Lambda Function for Integration Type, select the region you are located in, and select UpdatePetInfo for the Lambda function.
Click **Save** and then **OK** when prompted in the popup to grant permissions to the Lambda function.
**Test**, and paste the following for the request body:
```json lines theme={null}
{"pets": [
{"id": 1, "type": "dog", "price": 249.99},
{"id": 2, "type": "cat", "price": 124.99}
]
}
```
You should see an empty return result (`{}`).
Return to the GET method, and click **Test** again to see that the response body indicates there are two pets listed in the table:
```json lines theme={null}
[
{
"id": 1,
"price": 249.99,
"type": "dog"
},
{
"id": 2,
"price": 124.99,
"type": "cat"
}
]
```
#### Method: OPTIONS
Instead of creating a lambda function that performs no action, you can create an `OPTIONS` method on the API Gateway.
In the left pane, select `/pets`, and click **CreateMethod**. In the drop down, select OPTIONS, and click the checkmark button. Select Mock for Integration Type. Click **Save**.
Leaving the Response Body blank, click **Test**. You should receive a Response Body indicating `no data`.
At this point, the AWS Lambda functions and the Amazon API Gateway methods are defined with no security.
On the Attach Policy screen, skip this step by clicking **Next Step**. At this point, review the information you provided. If all looks correct, click **Create Role**. When finished, you should see your role listed on the IAM homepage.
Select the role you just created, **APIGatewayLambdaExecRole**. Click the down arrow for Inline Policies and click the **Click Here** link.
Select Custom Policy, and then click **Select**. Name the policy `LogAndDynamoDBAccess` and add the following code as the policy document (be sure to first update the Amazon Resource Name (ARN) for your DynamoDB table). Click **Apply Policy**.
```json lines theme={null}
{
"Version": "2012-10-17",
"Statement": [
{
"Sid": "AccessCloudwatchLogs",
"Action": ["logs:*"],
"Effect": "Allow",
"Resource": "arn:aws:logs:*:*:*"
},
{
"Sid": "PetsDynamoDBReadWrite",
"Effect": "Allow",
"Action": [
"dynamodb:DeleteItem",
"dynamodb:GetItem",
"dynamodb:PutItem",
"dynamodb:UpdateItem"
],
"Resource": ["DYNAMODB_TABLE_ARN_VALUE_FROM_PREVIOUS_STEP"]
}
]
}
```
### Step 2. Create the AWS Lambda Functions
The next three steps create the AWS Lambda functions for retrieving and updating pet information in the DynamoDB table.
#### Create the Lambda Function for GetPetInfo
In the [AWS Lambda Console](https://console.aws.amazon.com/lambda), select **Create a Lambda Function** (if you have not created an AWS Lambda function before, you will click **Get Started Now**).
On the Select blueprint screen, click **Blank Function**.
You will then be prompted to Configure triggers. Click **Next** to proceed. You do not have to do so at this point.
Finally, you will be asked to Configure function.
Populate the appropriate fields with the following information:
* **Name**: `GetPetInfo`
* **Runtime**: Node.js 6.10
Paste the following code to read pet information from the DynamoDB table into the **Lambda function code** area.
```javascript lines theme={null}
var AWS = require('aws-sdk');
var DOC = require('dynamodb-doc');
var dynamo = new DOC.DynamoDB();
exports.handler = function(event, context) {
var cb = function(err, data) {
if(err) {
console.log('error on GetPetsInfo: ',err);
context.done('Unable to retrieve pet information', null);
} else {
if(data.Item && data.Item.pets) {
context.done(null, data.Item.pets);
} else {
context.done(null, {});
}
}
};
dynamo.getItem({TableName:"Pets", Key:{username:"default"}}, cb);
};
```
For Role, select **Choose an existing role**. Next, choose **APIGatewayLambdaExecRole** as the Existing Role. Leave all other settings at their default values.
Click **Next** to review the information you provided. If all looks correct, click **Create function**.
Click **Test**, leaving the Input test event at its default (which uses the Hello World template). When the test completes, you should see an empty output (`{}`) in the Execution Result section. The table is empty.
#### Create the Lambda Function for UpdatePetInfo
Repeat the instructions used to create the `GetPetInfo` function, but use the following instead as the function code:
```javascript lines theme={null}
var AWS = require('aws-sdk');
var DOC = require('dynamodb-doc');
var dynamo = new DOC.DynamoDB();
exports.handler = function(event, context) {
var item = { username:"default",
pets: event.pets || {}
};
var cb = function(err, data) {
if(err) {
console.log(err);
context.fail('unable to update pets at this time');
} else {
console.log(data);
context.done(null, data);
}
};
dynamo.putItem({TableName:"Pets", Item:item}, cb);
};
```
Test the function by clicking the Actions drop-down and choosing **Configure sample event**. Enter the following for sample data and click **Submit**:
```json lines theme={null}
{
"pets": [{
"id": 1,
"type": "dog",
"price": 249.99
}]
}
```
You should see an empty return result (`{}`).
Return to your `GetPetInfo` Lambda function and click **Test** again. You should now see a single pet.
#### Create the Third Lambda Function
You will create one additional Lambda function. While this function will do nothing, it is required by the OPTIONS method for CORS as described in a later section.
Using the steps described above, create a Lambda function named `NoOp`. The function's code will be as follows:
```js lines theme={null}
exports.handler = function(event, context) {
context.succeed('');
}
```
Instead of creating this third Lambda function, you may choose to [create an OPTIONS method](#method-options) on the API Gateway.
### Step 3. Create the Amazon API Gateway API
You will create an API with two methods: one will `GET` pet information, and one will `POST` pet information.
#### Method: GET Pet Information
Go to the [Amazon API Gateway Console](https://console.aws.amazon.com/apigateway), and click **Create API**. If this is the first time you are creating an API, you will see a screen prompting you to **Get Started** instead.
If this is the first time you are creating an API, you will be prompted to create an Example API. Click **OK** to exit the pop-up notification, and choose the **New API** radio button instead of the **Example API** button.
Name the API `SecurePets` and click **Create API**.
Navigate to the Resources tab of the `SecurePets` API and click the **Create Resource** action.
Name the resource `Pets` and click **Create Resource** again.
In the left pane, select `/pets` and then click the **CreateMethod** button.
In the drop-down, select GET and click the checkmark button. Provide the following configuration values for the `GET` method:
* **Integration type**: Lambda Function;
* **Lambda Region**: Region you are located in;
* **Lambda Function**: GetPetInfo.
Click **Save** and then **OK** when prompted in the popup to grant permissions to the Lambda function.
In the Method Execution window that appears next, click **Test**.
You should see the single pet returned in the response body.
#### Method: POST Pet Information
Creating the API used to `POST` pet information is similar to creating the one used to `GET` pet information.
In the left pane, select `/pets`, and click **CreateMethod**.
In the drop-down, select POST, and click the checkmark button.
Select Lambda Function for Integration Type, select the region you are located in, and select UpdatePetInfo for the Lambda function.
Click **Save** and then **OK** when prompted in the popup to grant permissions to the Lambda function.
**Test**, and paste the following for the request body:
```json lines theme={null}
{"pets": [
{"id": 1, "type": "dog", "price": 249.99},
{"id": 2, "type": "cat", "price": 124.99}
]
}
```
You should see an empty return result (`{}`).
Return to the GET method, and click **Test** again to see that the response body indicates there are two pets listed in the table:
```json lines theme={null}
[
{
"id": 1,
"price": 249.99,
"type": "dog"
},
{
"id": 2,
"price": 124.99,
"type": "cat"
}
]
```
#### Method: OPTIONS
Instead of creating a lambda function that performs no action, you can create an `OPTIONS` method on the API Gateway.
In the left pane, select `/pets`, and click **CreateMethod**. In the drop down, select OPTIONS, and click the checkmark button. Select Mock for Integration Type. Click **Save**.
Leaving the Response Body blank, click **Test**. You should receive a Response Body indicating `no data`.
At this point, the AWS Lambda functions and the Amazon API Gateway methods are defined with no security.