> ## Documentation Index
> Fetch the complete documentation index at: https://auth0.com/llms.txt
> Use this file to discover all available pages before exploring further.
> How to connect provider hosted apps to SharePoint Online.
# Connect Provider Hosted Apps to SharePoint Online
export const AuthCodeBlock = ({filename, icon, language, highlight, children}) => {
const [displayText, setDisplayText] = useState(children);
const [copyText, setCopyText] = useState(children);
const wrapperRef = React.useRef(null);
useEffect(() => {
let unsubscribe = null;
function init() {
if (!window.autorun || !window.rootStore) {
return;
}
unsubscribe = window.autorun(() => {
let processedChildrenForDisplay = children;
let processedChildrenForCopy = children;
for (const [key, value] of window.rootStore.variableStore.values.entries()) {
const escapedKey = key.replaceAll(/[.*+?^${}()|[\]\\]/g, (String.raw)`\$&`);
let displayValue = value;
if (key === "{yourClientSecret}" && value !== "{yourClientSecret}") {
displayValue = value.substring(0, 3) + "*****MASKED*****";
}
processedChildrenForDisplay = processedChildrenForDisplay.replaceAll(new RegExp(escapedKey, "g"), displayValue);
processedChildrenForCopy = processedChildrenForCopy.replaceAll(new RegExp(escapedKey, "g"), value);
}
setDisplayText(processedChildrenForDisplay);
setCopyText(processedChildrenForCopy);
});
}
if (window.rootStore) {
init();
} else {
window.addEventListener("adu:storeReady", init);
}
return () => {
window.removeEventListener("adu:storeReady", init);
unsubscribe?.();
};
}, [children]);
useEffect(() => {
if (!wrapperRef.current) return;
const originalWriteText = navigator.clipboard.writeText.bind(navigator.clipboard);
let isOverriding = false;
const handleClick = e => {
const button = e.target.closest('[data-testid="copy-code-button"]');
if (!button || !wrapperRef.current.contains(button)) return;
isOverriding = true;
navigator.clipboard.writeText = text => {
if (isOverriding) {
isOverriding = false;
navigator.clipboard.writeText = originalWriteText;
return originalWriteText(copyText);
}
return originalWriteText(text);
};
setTimeout(() => {
if (isOverriding) {
isOverriding = false;
navigator.clipboard.writeText = originalWriteText;
}
}, 100);
};
const wrapper = wrapperRef.current;
wrapper.addEventListener('click', handleClick, true);
return () => {
wrapper.removeEventListener('click', handleClick, true);
if (navigator.clipboard.writeText !== originalWriteText) {
navigator.clipboard.writeText = originalWriteText;
}
};
}, [copyText]);
return
{displayText}
;
};
Auth0 can help radically simplify the authentication process for SharePoint Apps. Auth0 will negotiate an Access Token you can the use to call SharePoint APIs.
You won't need any special libraries. You can use any of the SDKs supported by Auth0.
## Step 1. Register your application in Auth0
Just register a new application in Auth0 as you would normally do: **Applications > NEW**. Pick up any of the SDKs available for detailed instructions. Keep the `client_id` handy, as you will need it in the next step.
## Step 2. Create a package for your application
You need to obtain a **Client ID** and a **Client Secret** for your application. There are many ways of registering your application depending on the expected usage.
[Register SharePoint Add-ins (Microsoft Docs)](https://docs.microsoft.com/en-us/sharepoint/dev/sp-add-ins/register-sharepoint-add-ins) explains all different ways of registering your application in SharePoint. This step in the tutorial will use the simplest form: using self-registration in a specific tenant (yours).
### Open SharePoint Online
The URL for the dashboard is `https://{your Office365 tenant}.sharepoint.com/_layouts/15/appregnew.aspx`
### Generate a Client\_Id and ClientSecret:
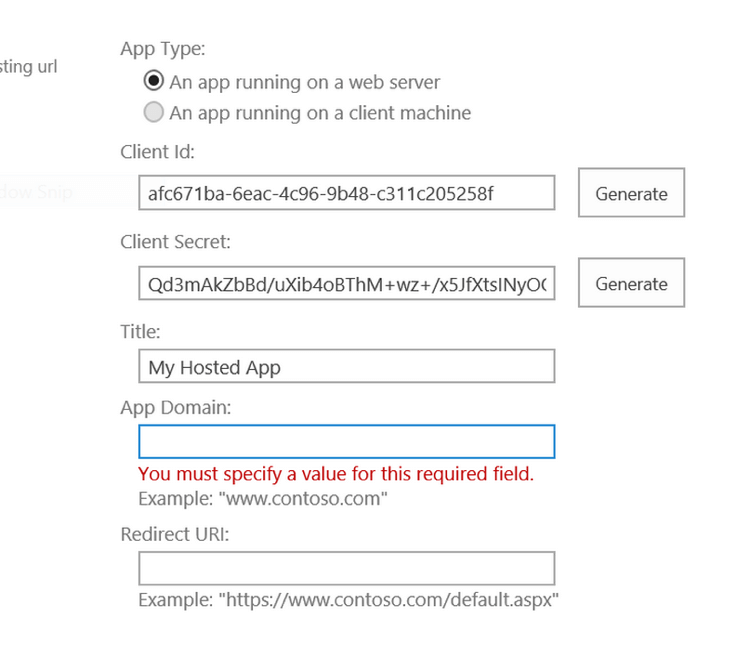 ### Complete the information in the form:
Since Auth0 is in between your app and the Office 365 infrastructure, you need to use this URL for the app:
**App Domain**:
export const codeExample1 = `{yourDomain}`;
**Redirect URI**:
export const codeExample2 = `https://{yourDomain}/login/callback?SP_APP_TOKEN&connection=CONNECTION&client_id={yourClientId}&redirect_uri={https://yourApp/callback}`;
* `connection` is just the name you will use in Auth0's connections (such as "sharepoint").
* `client_id` identifies your app in Auth0 (created in steps 1).
* `redirect_uri` is the location in your actual app, where your users will land eventually after all negotiations complete. If you don't specify it, it will always be the app's callback URL defined in Auth0 (it could be localhost)
### Package the app and upload to SharePoint:
Complete the information in your app manifest in Visual Studio:
### Complete the information in the form:
Since Auth0 is in between your app and the Office 365 infrastructure, you need to use this URL for the app:
**App Domain**:
export const codeExample1 = `{yourDomain}`;
**Redirect URI**:
export const codeExample2 = `https://{yourDomain}/login/callback?SP_APP_TOKEN&connection=CONNECTION&client_id={yourClientId}&redirect_uri={https://yourApp/callback}`;
* `connection` is just the name you will use in Auth0's connections (such as "sharepoint").
* `client_id` identifies your app in Auth0 (created in steps 1).
* `redirect_uri` is the location in your actual app, where your users will land eventually after all negotiations complete. If you don't specify it, it will always be the app's callback URL defined in Auth0 (it could be localhost)
### Package the app and upload to SharePoint:
Complete the information in your app manifest in Visual Studio:
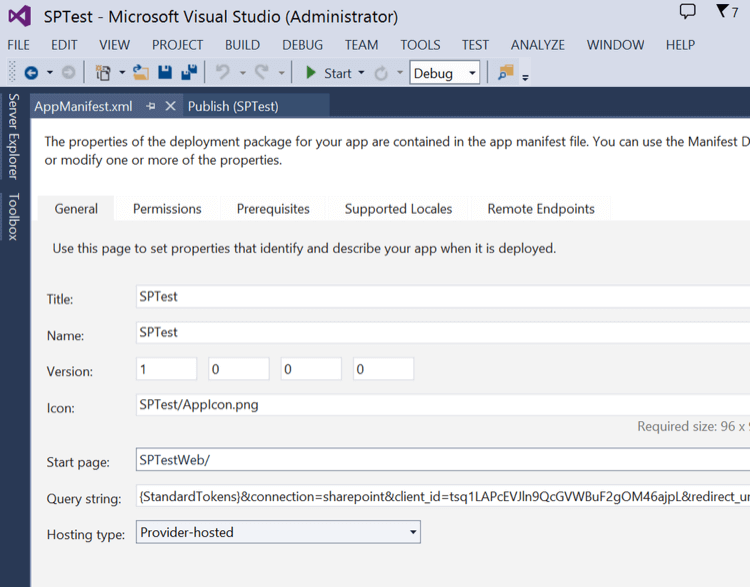 Notice the `Query string` will be exactly like the `Redirect URI` you completed before. Then right-click on the project and select `Publish`:
Create a **Publishing Profile** (you will have to enter the same **Client Id** & **Client Secret** obtained in the SharePoint dashboard).
Click on **Package** and upload the resulting file to SharePoint.
## Step 3. Create the Connection in Auth0
The last step in the integration is to add a SharePoint connection in Auth0.
You will need:
* `Connection Name`. This is an arbitrary name. It has to match with what you entered in step 2.
* `Client Id` & `Client Secret`. Also need to match what you entered in step 2.
* `Test SharePoint Site Url`. This is the SP site URL used to test the connection. (such as when pressing the 'Try' button on the dashboard). This is never used at runtime because users will always follow the link to your site from within SharePoint.
Users will install your app from the Office Marketplace. When they click on the link, they will be directed to Auth0, which will negotiate the Access Token for you, and finally to your app. Your app will receive a `User Profile` that will look like this:
Notice the `Query string` will be exactly like the `Redirect URI` you completed before. Then right-click on the project and select `Publish`:
Create a **Publishing Profile** (you will have to enter the same **Client Id** & **Client Secret** obtained in the SharePoint dashboard).
Click on **Package** and upload the resulting file to SharePoint.
## Step 3. Create the Connection in Auth0
The last step in the integration is to add a SharePoint connection in Auth0.
You will need:
* `Connection Name`. This is an arbitrary name. It has to match with what you entered in step 2.
* `Client Id` & `Client Secret`. Also need to match what you entered in step 2.
* `Test SharePoint Site Url`. This is the SP site URL used to test the connection. (such as when pressing the 'Try' button on the dashboard). This is never used at runtime because users will always follow the link to your site from within SharePoint.
Users will install your app from the Office Marketplace. When they click on the link, they will be directed to Auth0, which will negotiate the Access Token for you, and finally to your app. Your app will receive a `User Profile` that will look like this:
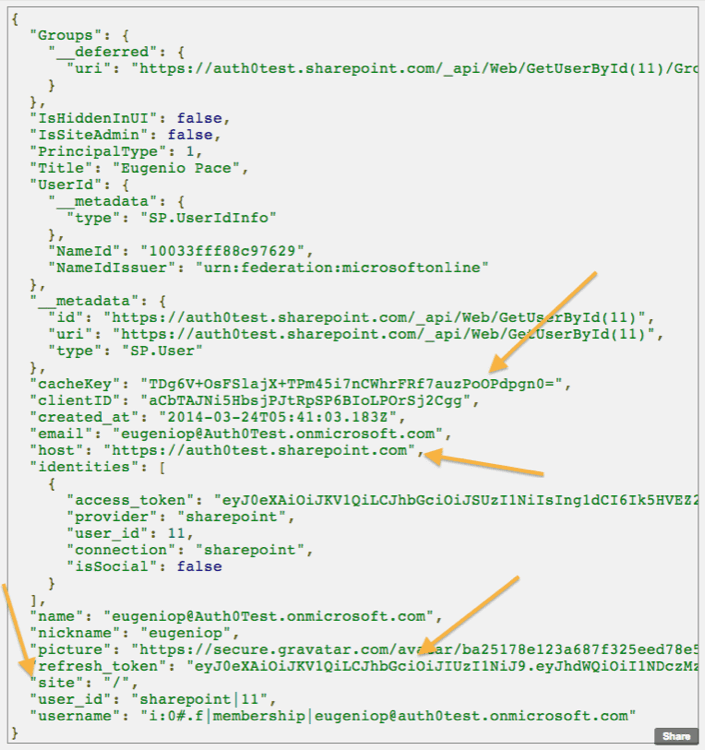 The following properties will be included: `cacheKey`, `refresh_token`, `host`, and `site`. These will allow you to call back SharePoint APIs (such as lists).