> ## Documentation Index
> Fetch the complete documentation index at: https://auth0.com/llms.txt
> Use this file to discover all available pages before exploring further.
> Describes how to use your backend server to authenticate a single-page app (SPA) with cookies.
# Authenticate Single-Page Apps With Cookies
export const AuthCodeBlock = ({filename, icon, language, highlight, children}) => {
const [displayText, setDisplayText] = useState(children);
const [copyText, setCopyText] = useState(children);
const wrapperRef = React.useRef(null);
useEffect(() => {
let unsubscribe = null;
function init() {
if (!window.autorun || !window.rootStore) {
return;
}
unsubscribe = window.autorun(() => {
let processedChildrenForDisplay = children;
let processedChildrenForCopy = children;
for (const [key, value] of window.rootStore.variableStore.values.entries()) {
const escapedKey = key.replaceAll(/[.*+?^${}()|[\]\\]/g, (String.raw)`\$&`);
let displayValue = value;
if (key === "{yourClientSecret}" && value !== "{yourClientSecret}") {
displayValue = value.substring(0, 3) + "*****MASKED*****";
}
processedChildrenForDisplay = processedChildrenForDisplay.replaceAll(new RegExp(escapedKey, "g"), displayValue);
processedChildrenForCopy = processedChildrenForCopy.replaceAll(new RegExp(escapedKey, "g"), value);
}
setDisplayText(processedChildrenForDisplay);
setCopyText(processedChildrenForCopy);
});
}
if (window.rootStore) {
init();
} else {
window.addEventListener("adu:storeReady", init);
}
return () => {
window.removeEventListener("adu:storeReady", init);
unsubscribe?.();
};
}, [children]);
useEffect(() => {
if (!wrapperRef.current) return;
const originalWriteText = navigator.clipboard.writeText.bind(navigator.clipboard);
let isOverriding = false;
const handleClick = e => {
const button = e.target.closest('[data-testid="copy-code-button"]');
if (!button || !wrapperRef.current.contains(button)) return;
isOverriding = true;
navigator.clipboard.writeText = text => {
if (isOverriding) {
isOverriding = false;
navigator.clipboard.writeText = originalWriteText;
return originalWriteText(copyText);
}
return originalWriteText(text);
};
setTimeout(() => {
if (isOverriding) {
isOverriding = false;
navigator.clipboard.writeText = originalWriteText;
}
}, 100);
};
const wrapper = wrapperRef.current;
wrapper.addEventListener('click', handleClick, true);
return () => {
wrapper.removeEventListener('click', handleClick, true);
if (navigator.clipboard.writeText !== originalWriteText) {
navigator.clipboard.writeText = originalWriteText;
}
};
}, [copyText]);
return
{displayText}
;
};
export const codeExample = `ISSUER_BASE_URL="{yourDomain}"
CLIENT_ID="{yourClientId}"
BASE_URL="http://localhost:3000"
APP_SESSION_SECRET=""`;
Securing a single-page app (SPA) can be a challenge. However, if your SPA meets the following criteria, then you can simplify your implementation by using cookies to authenticate.
* Served to the client using your own backend.
* Has the same domain as your backend.
* Makes API calls that require authentication to your backend.
Here is a description of this approach as well as a sample implementation using [Node.js](https://nodejs.org/en/).
## How it works
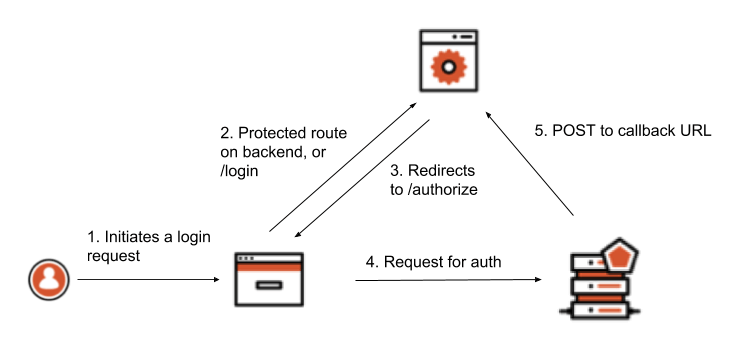
The steps below show how tokens are retrieved and used. In this approach, the [Implicit Flow with Form Post](/docs/get-started/authentication-and-authorization-flow/implicit-flow-with-form-post) is used instead of a traditional [Authorization Code Flow with Proof Key for Code Exchange](/docs/get-started/authentication-and-authorization-flow/authorization-code-flow-with-pkce). This is because Form Post Response Mode is a simpler way to implement login when it’s your own resource you are requesting to access.
 1. The user accesses a protected route using the browser, or performs some action that requires an authentication step to be initiated (such as clicking on a Login button)
2. The browser client redirects to a `/login` route on the backend, or to the protected route depending on what the user did
3. The backend constructs a request to the authorization server’s `/authorize` endpoint and redirects the browser client there
4. The user is prompted to authenticate themselves using whatever method the authorization server presents
5. The authorization server POSTs the tokens to the redirect URI as a URL-encoded form post. The backend is able to retrieve those tokens by parsing the body data.
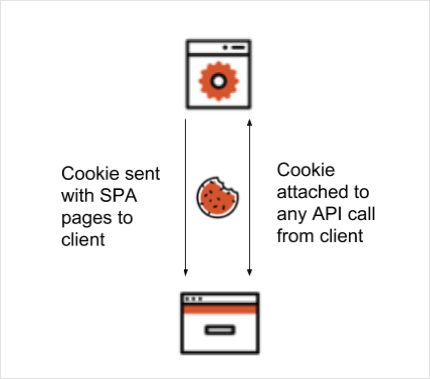
At this point, the user is authenticated and the backend has the required tokens. A cookie can now be created to represent this state on the client. The client browser is then redirected to a route that serves the SPA and also receives the authentication cookie.
From now on, this cookie is traded between the client and backend when API calls are made using an AJAX call. On each request, the backend verifies if the cookie is still valid and if so, allows the request to continue.
1. The user accesses a protected route using the browser, or performs some action that requires an authentication step to be initiated (such as clicking on a Login button)
2. The browser client redirects to a `/login` route on the backend, or to the protected route depending on what the user did
3. The backend constructs a request to the authorization server’s `/authorize` endpoint and redirects the browser client there
4. The user is prompted to authenticate themselves using whatever method the authorization server presents
5. The authorization server POSTs the tokens to the redirect URI as a URL-encoded form post. The backend is able to retrieve those tokens by parsing the body data.
At this point, the user is authenticated and the backend has the required tokens. A cookie can now be created to represent this state on the client. The client browser is then redirected to a route that serves the SPA and also receives the authentication cookie.
From now on, this cookie is traded between the client and backend when API calls are made using an AJAX call. On each request, the backend verifies if the cookie is still valid and if so, allows the request to continue.
 ### Invalid or missing cookies
When implementing this approach you'll need to handle cases where the authentication cookie is invalid or missing. The API call to the backend from the client happens in the background, so the client has to deal with any response from the server indicating the user should reauthenticate.
In the following sample application, this case is handled in a naive way by prompting the user to re-authenticate if the API call results in a 302 Redirect result. The 302 occurs because, upon unsuccessful validation of the cookie, the server tries to redirect to the Authorization endpoint of the authorization server and sends this response to the client.
## Example
The example application uses Node.js and Express to demonstrate the concepts covered above.
### Prerequisites
* To follow along, make sure you have the [latest version of Node](https://nodejs.org/en/download/) installed.
* Once Node is installed, [download or clone the source code](https://github.com/auth0-blog/spa-cookie-demo/) and open the project folder inside a terminal window.
```bash lines theme={null}
# Clone the tutorial respository using SSH
git clone git@github.com:auth0-blog/spa-cookie-demo
# ... or if you use HTTPS:
git clone https://github.com/auth0-blog/spa-cookie-demo.git
# Move into the project directory
cd spa-cookie-demo
```
* The `master` branch represents the state of the application before any authentication is added. If you would like to refer to the final version of the application, check out the `with-oidc` branch:
`git checkout with-oidc`
### Initialize the Node.js app
Install the application dependencies by running `npm install` from your terminal window. To run the application, use `npm run dev`. This starts the Express server. Go to [http://localhost:3000](http://localhost:3000/) in your browser to view the application.
The development servers uses `nodemon`, which automatically restarts whenever it detects any file changes.
### Explore the application
With the application open at [http://localhost:3000](http://localhost:3000/), click the **Call API** button. You should see a message displayed on the screen.
### Invalid or missing cookies
When implementing this approach you'll need to handle cases where the authentication cookie is invalid or missing. The API call to the backend from the client happens in the background, so the client has to deal with any response from the server indicating the user should reauthenticate.
In the following sample application, this case is handled in a naive way by prompting the user to re-authenticate if the API call results in a 302 Redirect result. The 302 occurs because, upon unsuccessful validation of the cookie, the server tries to redirect to the Authorization endpoint of the authorization server and sends this response to the client.
## Example
The example application uses Node.js and Express to demonstrate the concepts covered above.
### Prerequisites
* To follow along, make sure you have the [latest version of Node](https://nodejs.org/en/download/) installed.
* Once Node is installed, [download or clone the source code](https://github.com/auth0-blog/spa-cookie-demo/) and open the project folder inside a terminal window.
```bash lines theme={null}
# Clone the tutorial respository using SSH
git clone git@github.com:auth0-blog/spa-cookie-demo
# ... or if you use HTTPS:
git clone https://github.com/auth0-blog/spa-cookie-demo.git
# Move into the project directory
cd spa-cookie-demo
```
* The `master` branch represents the state of the application before any authentication is added. If you would like to refer to the final version of the application, check out the `with-oidc` branch:
`git checkout with-oidc`
### Initialize the Node.js app
Install the application dependencies by running `npm install` from your terminal window. To run the application, use `npm run dev`. This starts the Express server. Go to [http://localhost:3000](http://localhost:3000/) in your browser to view the application.
The development servers uses `nodemon`, which automatically restarts whenever it detects any file changes.
### Explore the application
With the application open at [http://localhost:3000](http://localhost:3000/), click the **Call API** button. You should see a message displayed on the screen.
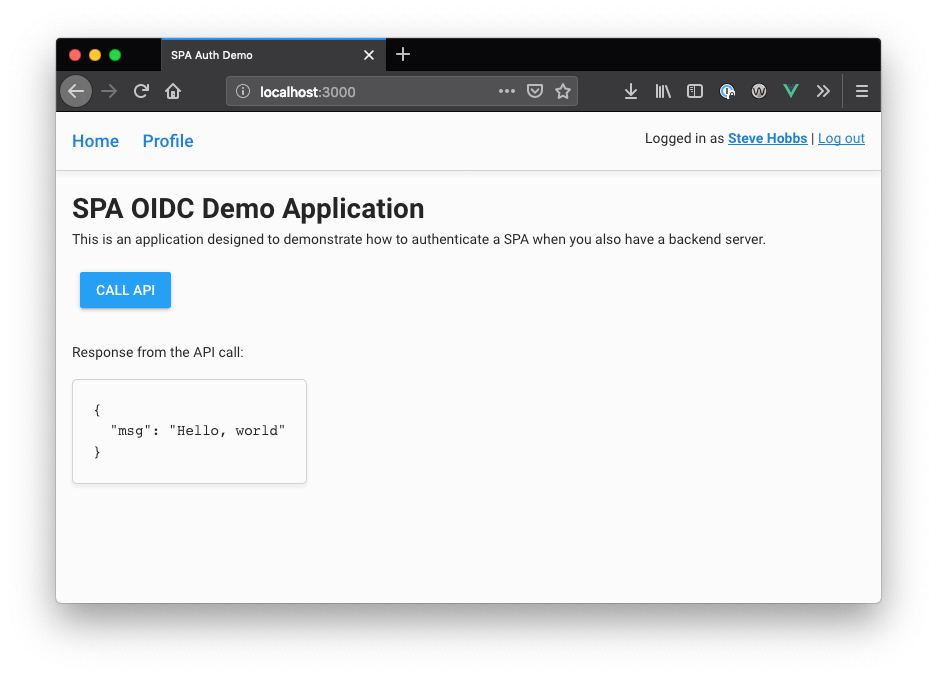 Note that you were able to make the API call without being logged in. Let's fix that by adding some middleware that requires the user to authenticate before the API call can be made.
### Set up environment
For the application to work with authentication, `express-openid-connect` requires some environment variables to be present. For this application, these variables can be specified in a `.env` file. Create a `.env` file in the root of the project directory and populate it with the following:
```shell .env lines theme={null}
ISSUER_BASE_URL=""
CLIENT_ID=""
BASE_URL="http://localhost:3000"
APP_SESSION_SECRET=""
```
### Set up app in Auth0
1. Go to [Dashboard > Applications > Applications](https://manage.auth0.com/#/applications) and click **Create Application**.
2. Name your new application, select **Regular Web Applications**, and click **Create**
3. In the **Settings** for your new app, add `http:/localhost:3000/callback` to **Allowed Callback URLs**.
4. Add `http:/localhost:3000` to **Allowed Logout URLs**.
5. Click **Save Changes**.
6. Go to [Dashboard > Authentication > Social](https://manage.auth0.com/#/connections/social) and set up some social connections. Enable them for your app in the **Application** options in the **Connections** tab. The example uses username/password database, Facebook, Google, and X.
7. On the **Settings** screen, note the domain and client ID settings at the top.
8. There are two values that need to be configured as part of the application. Reopen the `.env` file and set these values:
### Run the app
1. With the server and environment configuration done, find your browser window that has the application open. If you've closed the browser and stopped the server, run the following from the terminal to restart the application:
`npm run dev`
2. Open `http://localhost:3000` in the browser. From a user interface perspective, the app should look the same, however this time when the **Call API** button is clicked, you should receive a warning that the user is not logged in. Also note that you do not see the "Hello, World" message as before since the call to the API has been rejected.
3. Click **Log in now** to log in. Once you have been authenticated, you'll return to the app and see an updated UI that reflects your new logged-in state. You should be able to press the **Call API** button once more to invoke an API call to the server, and it now works.
4. Click the **Profile** link at the top of the page to show user information retrieved from the ID token.
## Learn more
* [Implicit Flow with Form Post](/docs/get-started/authentication-and-authorization-flow/implicit-flow-with-form-post)
* [Secure](/docs/secure)
* [SameSite Cookie Attribute Changes](/docs/manage-users/cookies/samesite-cookie-attribute-changes)
Note that you were able to make the API call without being logged in. Let's fix that by adding some middleware that requires the user to authenticate before the API call can be made.
### Set up environment
For the application to work with authentication, `express-openid-connect` requires some environment variables to be present. For this application, these variables can be specified in a `.env` file. Create a `.env` file in the root of the project directory and populate it with the following:
```shell .env lines theme={null}
ISSUER_BASE_URL=""
CLIENT_ID=""
BASE_URL="http://localhost:3000"
APP_SESSION_SECRET=""
```
### Set up app in Auth0
1. Go to [Dashboard > Applications > Applications](https://manage.auth0.com/#/applications) and click **Create Application**.
2. Name your new application, select **Regular Web Applications**, and click **Create**
3. In the **Settings** for your new app, add `http:/localhost:3000/callback` to **Allowed Callback URLs**.
4. Add `http:/localhost:3000` to **Allowed Logout URLs**.
5. Click **Save Changes**.
6. Go to [Dashboard > Authentication > Social](https://manage.auth0.com/#/connections/social) and set up some social connections. Enable them for your app in the **Application** options in the **Connections** tab. The example uses username/password database, Facebook, Google, and X.
7. On the **Settings** screen, note the domain and client ID settings at the top.
8. There are two values that need to be configured as part of the application. Reopen the `.env` file and set these values:
### Run the app
1. With the server and environment configuration done, find your browser window that has the application open. If you've closed the browser and stopped the server, run the following from the terminal to restart the application:
`npm run dev`
2. Open `http://localhost:3000` in the browser. From a user interface perspective, the app should look the same, however this time when the **Call API** button is clicked, you should receive a warning that the user is not logged in. Also note that you do not see the "Hello, World" message as before since the call to the API has been rejected.
3. Click **Log in now** to log in. Once you have been authenticated, you'll return to the app and see an updated UI that reflects your new logged-in state. You should be able to press the **Call API** button once more to invoke an API call to the server, and it now works.
4. Click the **Profile** link at the top of the page to show user information retrieved from the ID token.
## Learn more
* [Implicit Flow with Form Post](/docs/get-started/authentication-and-authorization-flow/implicit-flow-with-form-post)
* [Secure](/docs/secure)
* [SameSite Cookie Attribute Changes](/docs/manage-users/cookies/samesite-cookie-attribute-changes)