> ## Documentation Index
> Fetch the complete documentation index at: https://auth0.com/llms.txt
> Use this file to discover all available pages before exploring further.
> Learn how to configure and use Connected Accounts for Token Vault.
# Connected Accounts for Token Vault
Connected Accounts for Token Vault enables applications to securely access external APIs on the user’s behalf through [Token Vault](/docs/secure/tokens/token-vault). While standard user authentication handles user login through a social or enterprise identity provider, Connected Accounts links a user profile to external services like Google, GitHub, Slack, and more, facilitating delegated access to external APIs on the user’s behalf.
Once a user successfully connects and authorizes access to a [supported external provider](/docs/secure/tokens/token-vault#supported-external-providers), Auth0:
* Associates the account with the user as a connected account.
* Stores the external provider’s access and refresh tokens for the connected account in the Token Vault.
Connected Accounts for Token Vault creates and manages a unified Auth0 user profile linked to multiple external accounts, enabling seamless authorization. Your application then fetches the stored credentials in Token Vault to interact with external APIs on the user’s behalf.
## User authentication vs Connected Accounts
When you [configure Connected Accounts](#configure-connected-accounts) for a supported social or enterprise connection, Auth0 uses the Connected Accounts flow (`/me/v1/connected-accounts` endpoint) to retrieve and store access and refresh tokens in the Token Vault instead of using the social or enterprise login flow (`/authorize` endpoint). After successfully completing the Connected Accounts flow, Auth0 adds the user account to the `connected_accounts` array on the user profile. In contrast, for the social or enterprise login flow, Auth0 adds the user account to the `identities` array on the user profile.
The following table explains the differences between the user authentication and Connected Accounts flows:
| | User Authentication | Connected Accounts |
| ------- | ----------------------------------------------------------------- | ---------------------------------------------------------------------------------------------------------------------------------------------------------------------------- |
| Flow | Login flow using the `/authorize` endpoint | Connected Accounts flow using the My Account API’s `/me/v1/connected-accounts` endpoint |
| Purpose | Authenticates users with a social or enterprise identity provider | Stores the access and refresh tokens for the connected account in Token Vault when a user logs in via a supported external provider, connects, and authorizes the connection |
You can enable user authentication, Connected Accounts, or both for supported social or enterprise connections. The following table explains the behavior for the different Purpose settings, including how to pass scopes to the connection:
| Authentication | Connected Accounts | Behavior | Scopes |
| -------------- | ------------------ | ----------------------------------------------------------------------------------------------------------------------------------------------------------------------------------------------------------------------------------------------------------------- | ----------------------------------------------------------------------------------------------------------------------------------------------------------------------------------------------------------------------------------------------------------------------------------------------------------------------------------------------------------------------------------------------------------------------------------------------------------------------------------------------------------------------------------------------------------------------------------------------------- |
| Enabled | Disabled | The connection uses the `/authorize` login flow to authenticate users as a valid identity provider. | Use the Auth0 Dashboard or Management API to pass the desired scopes for your connection. At runtime, this list is automatically completed with any additional scopes included in the `connection_scope` parameter of the authorization request. |
| Disabled | Enabled | The connection uses the Connected Accounts flow to retrieve and store the tokens for the connection in the Token Vault. The connection does not use the `/authorize` login flow to authenticate users, and is excluded from the list of valid identity providers. | Use the Auth0 Dashboard or Management API to pass the desired scopes to your connection. At runtime, any scopes included in the `scopes` parameter in the authorization request take precedence over the scopes selected in the Auth0 Dashboard except for `offline_access`, if required by the connection and enabled in the Auth0 Dashboard.
**Note:** If required by the connection, Auth0 will prompt you to enable `offline_access`, allowing the client application to fetch a refresh token from Auth0. You must enable `offline_access` for the connection in the Auth0 Dashboard. |
| Enabled | Enabled | The connection uses the `/authorize` login flow to authenticate users as a valid identity provider. It also uses the Connected Accounts flow to retrieve and store access tokens for the connection in the Token Vault. | Use the Auth0 Dashboard and Management API to pass the desired scopes to the connection. At runtime, any scopes included in the `scopes` parameter take precedence over the scopes selected in the Auth0 Dashboard except for `offline_access`, if required by the connection and enabled in the Auth0 Dashboard.
**Note:** If required by the connection, Auth0 will prompt you to enable `offline_access`, allowing the client application to fetch a refresh token from Auth0. You must enable `offline_access` for the connection in the Auth0 Dashboard. |
## How it works
The Connected Accounts flow uses the [My Account API](/docs/manage-users/my-account-api) to create and manage connected accounts for a user across supported external providers.
Before the user can initiate a Connected Accounts request from the client application, the client application needs to [get an access token](/docs/manage-users/my-account-api#get-an-access-token) with the Connected Accounts scopes to access the My Account API.
If your application uses [Organizations](/docs/manage-users/organizations), authenticate the user with the target organization before initiating the Connected Accounts flow. Token Vault stores the connected account on the user's Auth0 profile, so each organization member connects and authorizes their own external account.
The following sequence diagram illustrates the end-to-end Connected Accounts flow:
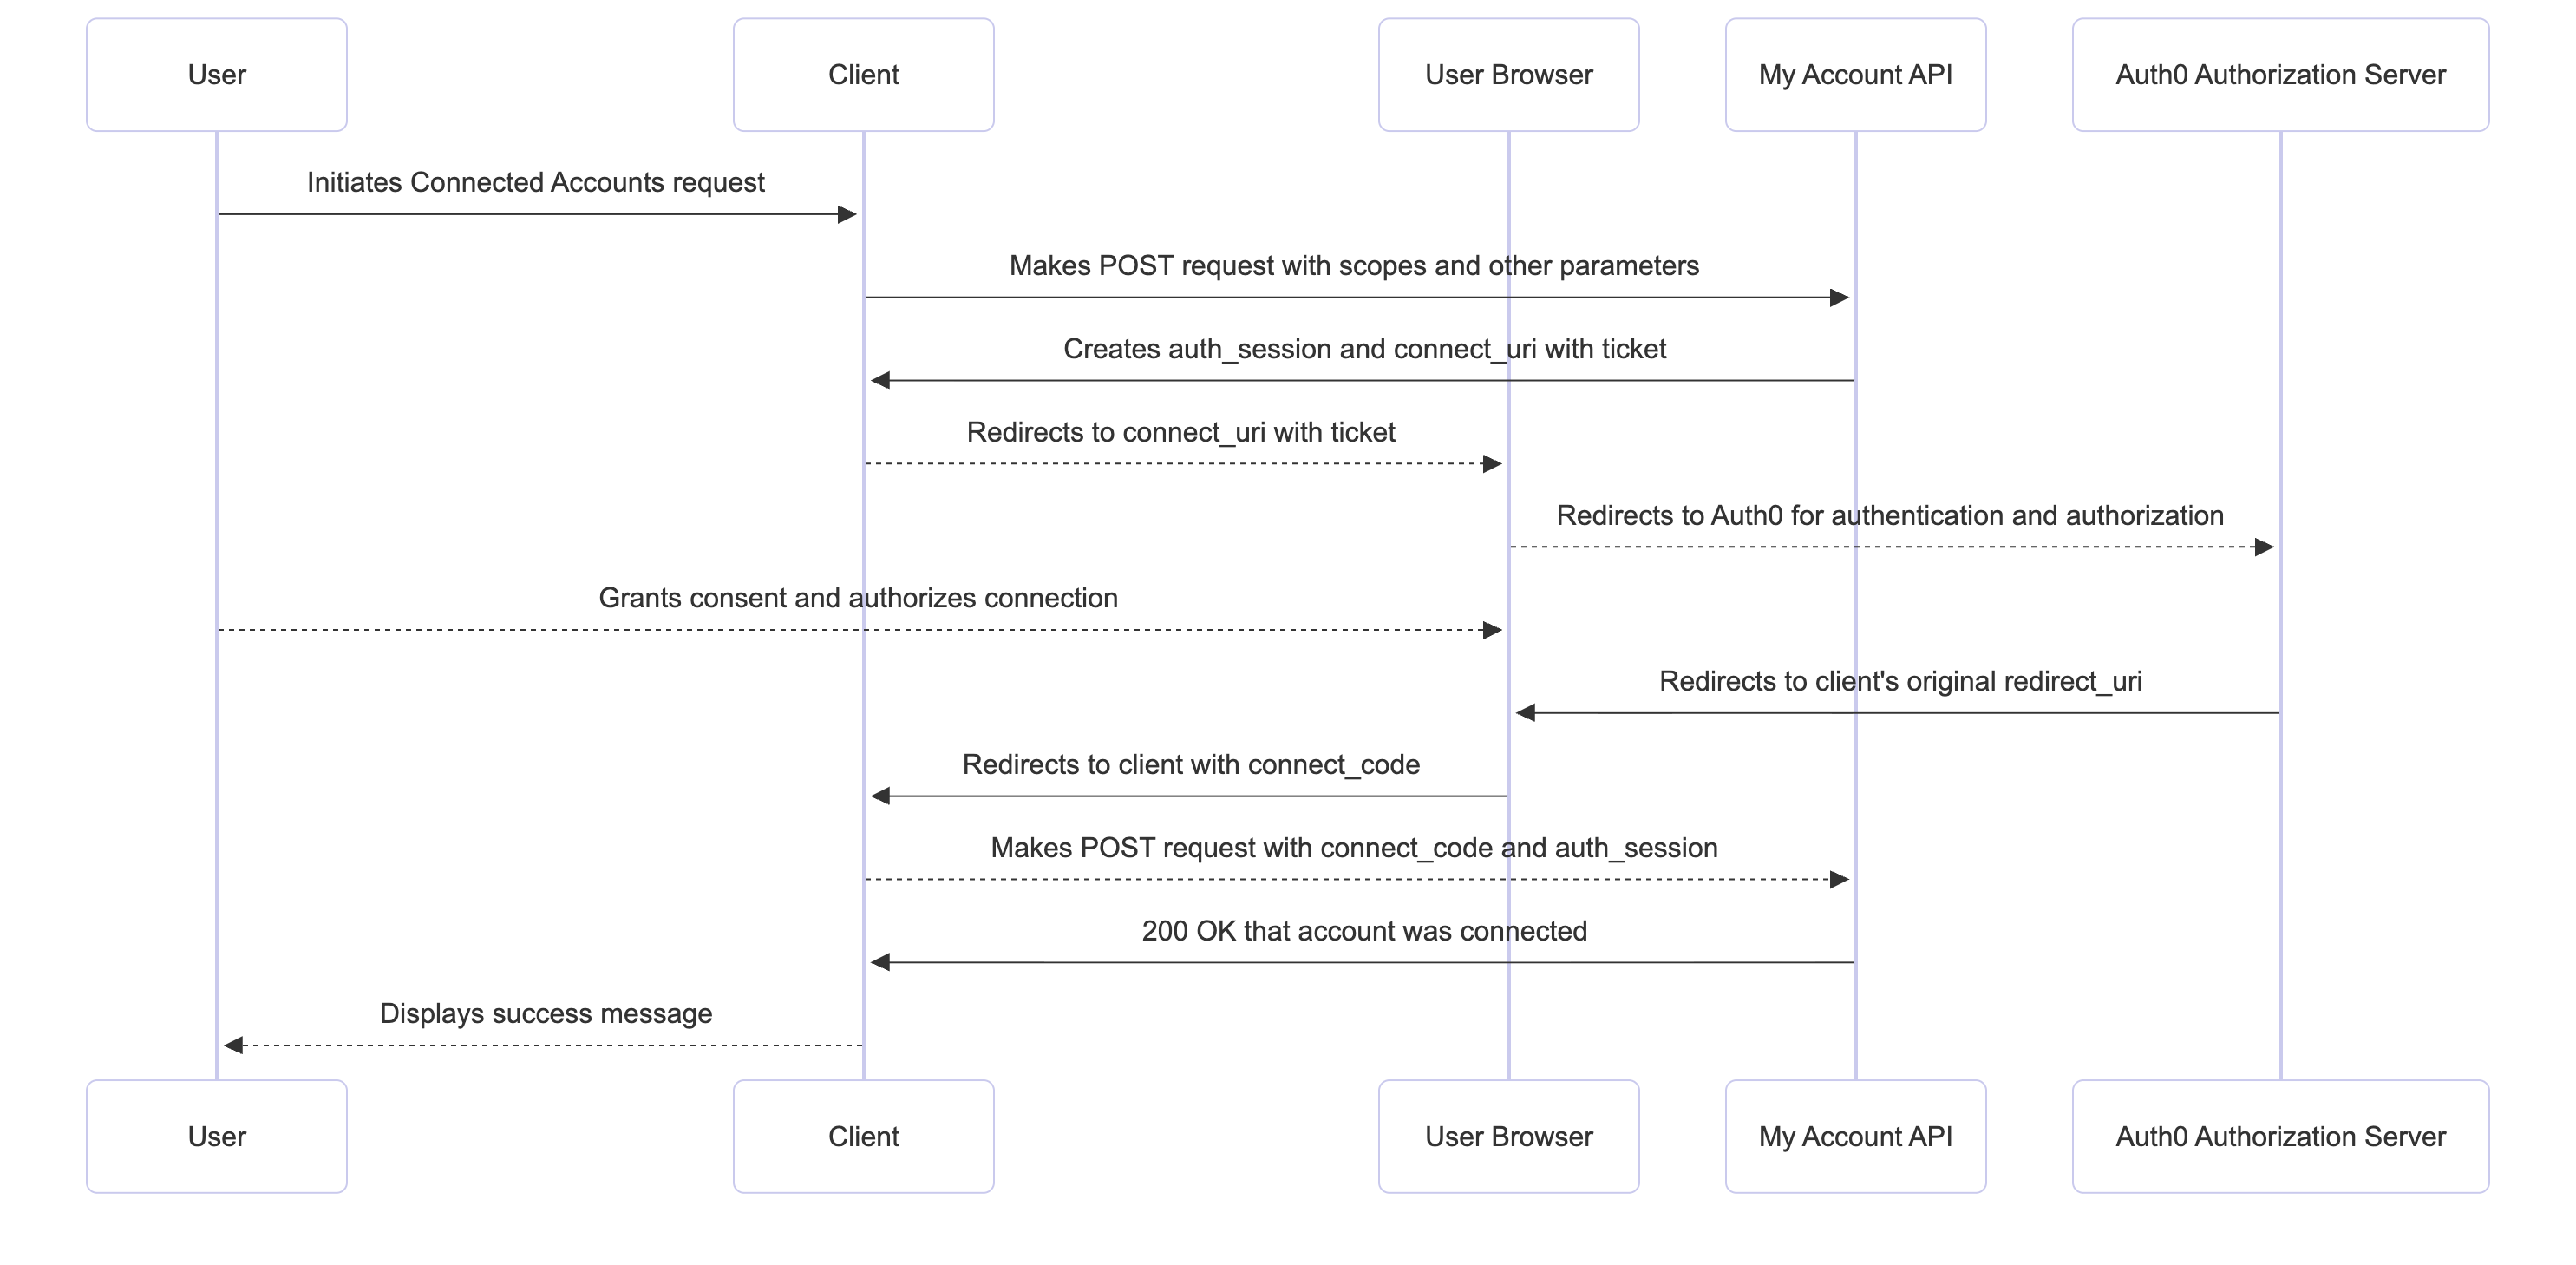 When a user logs in via a supported external provider through Auth0, they initiate a Connected Accounts request from the client application:
1. The client application makes a `POST` request to the My Account API’s `/me/v1/connected-accounts/connect` endpoint, passing scopes and other parameters to send to the external provider. To learn more, read [Initiate Connected Accounts request](#initiate-connected-accounts-request).
2. The My Account API creates a unique `auth_session` and `connect_uri` containing a `ticket` that redirects the user to a web browser. The client application saves the `auth_session` for later verification. If [DPoP](/docs/secure/sender-constraining/demonstrating-proof-of-possession-dpop) is configured, the My Account API validates the DPoP Proof JWT.
3. The client application redirects the user to the `connect_uri` with the `ticket` as a query parameter for user authentication and authorization in the browser. The client application may also pass a `code_challenge` or `code_challenge_method` to the URL, as in the [Authorization Code Flow with PKCE](/docs/get-started/authentication-and-authorization-flow/authorization-code-flow-with-pkce).
4. The user connects and authorizes the permissions for the connection in the consent screen.
5. After the user successfully authorizes the connection, the external provider redirects the user to the My Account API, which redirects the user to the client application using the `redirect_uri` with a single-use `connect_code`.
6. The client application presents the `connect_code`, `code_verifier` (if applicable), and the original `auth_session` to the My Account API by making a `POST` request to the `/me/v1/connected-accounts/complete` endpoint. To learn more, read [Complete Connected Accounts request](#complete-connected-accounts-request).
7. The My Account API validates the request by confirming:
* The `auth_session` matches the ID originally issued for the user
* The request is coming from the same device that initiated the Connected Accounts flow
* The DPoP Proof JWT (if configured)
* The single-use `connect_code`
* The `code_verifier` (if using the PKCE flow)
8. After successful validation, the Auth0 Authorization Server adds the account to the `connected_accounts` array on the user profile and stores the access and refresh tokens for the connected account in the Token Vault.
9. My Account API completes the flow by sending a `200` status code back to the client application, indicating that the account was successfully connected.
## Prerequisites
Before configuring Connected Accounts, make sure you:
* [Configure Token Vault](/docs/secure/tokens/token-vault/configure-token-vault) for your client application to securely store the access and refresh tokens associated with each connected account in the Token Vault.
* [Configure the My Account API](#configure-my-account-api), which is used by authenticated users to connect and manage accounts.
* [Configure Multi-Resource Refresh Token (MRRT)](#configure-multi-resource-refresh-token) to get an access token for the My Account API.
* (Optional) [Configure DPoP](/docs/secure/sender-constraining/configure-sender-constraining) for the My Account API and your client application to sender constrain access tokens, preventing token theft. By default, the My Account API can accept DPoP-bound access tokens.
### Configure My Account API
To use Connected Accounts, configure the My Account API in the Auth0 Dashboard:
1. Navigate to **Applications > APIs** and [activate the My Account API](/docs/manage-users/my-account-api#activate-the-my-account-api).
2. Once activated, select **Auth0 My Account API** and then the **Application Access** tab.
3. Find your client application and select **Edit** to configure its [application access policies](/docs/get-started/apis/api-access-policies-for-applications).
4. Select **User Access** and under **Authorization**, select **Authorized**.
5. For the permissions, select **All** the [Connected Accounts scopes](/docs/manage-users/my-account-api#scope) for the application.
6. Select **Save**. This creates a [client grant](/docs/get-started/applications/application-access-to-apis-client-grants) that allows your client application to access the My Account API with the Connected Accounts scopes on the user’s behalf.
7. If you’re using [Multi-Resource Refresh Token](/docs/secure/tokens/refresh-tokens/multi-resource-refresh-token#multi-resource-refresh-token), navigate to the **Settings** tab. Under **Access Settings**, select **Allow Skipping User Consent**.
### Configure Multi-Resource Refresh Token
Configure Multi-Resource Refresh Token (MRRT) to get a single long-lived refresh token that can be exchanged for new My Account API access tokens and other APIs without requiring the user to re-authenticate.
You can configure MRRT with the [Auth0 Dashboard](https://manage.auth0.com) or the [Management API](https://auth0.com/docs/api/management/v2).
To configure MRRT with the Auth0 Dashboard:
1. Navigate to **Applications > Applications** and select your application.
2. Under **Multi-Resource Refresh Token**, select **Edit Configuration**.
3. To enable MRRT with the My Account API, toggle on the **My Account API**.
To configure MRRT for a client application, make a `PATCH` request to the `/api/v2/clients/{clientId}` endpoint and add the My Account API identifier and Connected Accounts scopes to the refresh token policies:
```bash lines theme={null}
curl -X PATCH --location "https://${account.namespace}/api/v2/clients/{clientId}" \
-H "Authorization: Bearer " \
-H "Content-Type: application/json" \
-d '{
"is_first_party": true,
"refresh_token": {
"expiration_type": "non-expiring",
"leeway": 0,
"infinite_token_lifetime": true,
"infinite_idle_token_lifetime": true,
"token_lifetime": 31557600,
"idle_token_lifetime": 2592000,
"rotation_type": "non-rotating",
"policies": [
{
"audience": "https://'"$DOMAIN"'/me/",
"scope": [
"create:me:connected_accounts",
"read:me:connected_accounts",
"delete:me:connected_accounts"
]
}
]
}
}'
```
## Configure Connected Accounts
Before configuring Connected Accounts for a connection, make sure you’ve authorized the connection for your client application.
In the Auth0 Dashboard:
1. Navigate to **Authentication > Social Connections** or **Enterprise Connections** and select the connection.
2. Select **Applications** and then toggle on the connection for your client application.
You can configure Connected Accounts with the [Auth0 Dashboard](https://manage.auth0.com) or the [Management API](https://auth0.com/docs/api/management/v2).
To configure Connected Accounts with the Auth0 Dashboard:
1. Navigate to **Authentication > Social Connections** or **Enterprise Connections**.
2. Select **Create Connection** or select an existing connection.
3. In **Purpose**, toggle on **Connected Accounts for Token Vault**. Depending on your **Purpose** setting, you may need to enable `offline_access` in the Auth0 Dashboard, allowing the client application to obtain a refresh token from the external provider during the Connected Accounts flow. To learn more, read [User authentication vs Connected Accounts](#user-authentication-vs-connected-accounts).
4. Click **Save**.
To configure Connected Accounts with the Management API, make a `PATCH` request to the `/connections/{connectionId}` endpoint to set `connected_accounts` to `true`:
```bash lines theme={null}
curl -L -X PATCH "https://{yourDomain}/api/v2/connections/{connectionId}" \
-H 'Content-Type: application/json' \
-H 'Accept: application/json' \
-H "Authorization: Bearer " \
-d '{"connected_accounts":{"active":true}}'
```
## Get access token for Connected Accounts
Before initiating a Connected Accounts request, [get an access token](/docs/manage-users/my-account-api#scope) for the My Account API with the Connected Accounts scopes.
The following sections explain how to use [Multi-Resource Refresh Token (MRRT)](/docs/secure/tokens/refresh-tokens/multi-resource-refresh-token) to get an access token for the My Account API.
### Fetch a refresh token
After [configuring MRRT](#configure-multi-resource-refresh-token) for the client application, initiate the authorization code flow and exchange the resulting authorization code for a refresh token.
The following is an authorization code flow request for a confidential client that includes the `offline_scope` to return a refresh token and a single-use authorization code for the My Account API identifier `https://{yourDomain}/me/`:
```bash lines theme={null}
open "https://{yourDomain}/authorize?client_id=&response_type=code&prompt=login&scope=openid%20profile%20offline_access&redirect_uri=&state=&audience=https://my-example-api.com"
```
Exchange the single-use authorization code for a refresh token at the `/token` endpoint:
```bash lines theme={null}
curl -s --request POST \
--url "https://{yourDomain}/oauth/token" \
--header 'Content-Type: application/json' \
--data-binary @- <",
"client_id": "",
"client_secret": "",
"redirect_uri": ""
}
EOF
```
### Exchange refresh token for My Account API access token
Once you’ve obtained a refresh token, exchange it for a My Account API access token with the Connected Accounts scopes using the refresh token grant type:
```bash lines theme={null}
curl -s -X POST "https://{yourDomain}/oauth/token" \
-H "Content-Type: application/x-www-form-urlencoded" \
--data-urlencode "grant_type=refresh_token" \
--data-urlencode "client_id=" \
--data-urlencode "client_secret=" \
--data-urlencode "refresh_token=" \
--data-urlencode "audience=https://{yourDomain}/me/" \
--data-urlencode "scope=openid profile offline_access create:me:connected_accounts read:me:connected_accounts delete:me:connected_accounts"
```
## Initiate Connected Accounts request
To initiate a Connected Accounts request, make a `POST` request to the My Account API’s `/me/v1/connected-accounts/connect` endpoint with the following parameters:
For a Google social connection, make sure you select `offline_access` in the Auth0 Dashboard when configuring your connection. This is required for your client application to fetch a refresh token from the Auth0 Authorization Server.
| Parameter | Description |
| -------------- | --------------------------------------------------------------------------------------------------------------------------------------------------------------------------------------------------------------------------------------------------------------------------------------------------------------------------------------------------------------------------------------------------------------------- |
| `connection` | Name of connection. For a Google social connection, set to `google-oauth2`. |
| `redirect_uri` | The callback URL of your client application. |
| `state` | A unique, random string associated with the request to prevent attacks. |
| `scopes` | (Optional) The scopes passed to the external provider as an array of strings.
When a user logs in via a supported external provider through Auth0, they initiate a Connected Accounts request from the client application:
1. The client application makes a `POST` request to the My Account API’s `/me/v1/connected-accounts/connect` endpoint, passing scopes and other parameters to send to the external provider. To learn more, read [Initiate Connected Accounts request](#initiate-connected-accounts-request).
2. The My Account API creates a unique `auth_session` and `connect_uri` containing a `ticket` that redirects the user to a web browser. The client application saves the `auth_session` for later verification. If [DPoP](/docs/secure/sender-constraining/demonstrating-proof-of-possession-dpop) is configured, the My Account API validates the DPoP Proof JWT.
3. The client application redirects the user to the `connect_uri` with the `ticket` as a query parameter for user authentication and authorization in the browser. The client application may also pass a `code_challenge` or `code_challenge_method` to the URL, as in the [Authorization Code Flow with PKCE](/docs/get-started/authentication-and-authorization-flow/authorization-code-flow-with-pkce).
4. The user connects and authorizes the permissions for the connection in the consent screen.
5. After the user successfully authorizes the connection, the external provider redirects the user to the My Account API, which redirects the user to the client application using the `redirect_uri` with a single-use `connect_code`.
6. The client application presents the `connect_code`, `code_verifier` (if applicable), and the original `auth_session` to the My Account API by making a `POST` request to the `/me/v1/connected-accounts/complete` endpoint. To learn more, read [Complete Connected Accounts request](#complete-connected-accounts-request).
7. The My Account API validates the request by confirming:
* The `auth_session` matches the ID originally issued for the user
* The request is coming from the same device that initiated the Connected Accounts flow
* The DPoP Proof JWT (if configured)
* The single-use `connect_code`
* The `code_verifier` (if using the PKCE flow)
8. After successful validation, the Auth0 Authorization Server adds the account to the `connected_accounts` array on the user profile and stores the access and refresh tokens for the connected account in the Token Vault.
9. My Account API completes the flow by sending a `200` status code back to the client application, indicating that the account was successfully connected.
## Prerequisites
Before configuring Connected Accounts, make sure you:
* [Configure Token Vault](/docs/secure/tokens/token-vault/configure-token-vault) for your client application to securely store the access and refresh tokens associated with each connected account in the Token Vault.
* [Configure the My Account API](#configure-my-account-api), which is used by authenticated users to connect and manage accounts.
* [Configure Multi-Resource Refresh Token (MRRT)](#configure-multi-resource-refresh-token) to get an access token for the My Account API.
* (Optional) [Configure DPoP](/docs/secure/sender-constraining/configure-sender-constraining) for the My Account API and your client application to sender constrain access tokens, preventing token theft. By default, the My Account API can accept DPoP-bound access tokens.
### Configure My Account API
To use Connected Accounts, configure the My Account API in the Auth0 Dashboard:
1. Navigate to **Applications > APIs** and [activate the My Account API](/docs/manage-users/my-account-api#activate-the-my-account-api).
2. Once activated, select **Auth0 My Account API** and then the **Application Access** tab.
3. Find your client application and select **Edit** to configure its [application access policies](/docs/get-started/apis/api-access-policies-for-applications).
4. Select **User Access** and under **Authorization**, select **Authorized**.
5. For the permissions, select **All** the [Connected Accounts scopes](/docs/manage-users/my-account-api#scope) for the application.
6. Select **Save**. This creates a [client grant](/docs/get-started/applications/application-access-to-apis-client-grants) that allows your client application to access the My Account API with the Connected Accounts scopes on the user’s behalf.
7. If you’re using [Multi-Resource Refresh Token](/docs/secure/tokens/refresh-tokens/multi-resource-refresh-token#multi-resource-refresh-token), navigate to the **Settings** tab. Under **Access Settings**, select **Allow Skipping User Consent**.
### Configure Multi-Resource Refresh Token
Configure Multi-Resource Refresh Token (MRRT) to get a single long-lived refresh token that can be exchanged for new My Account API access tokens and other APIs without requiring the user to re-authenticate.
You can configure MRRT with the [Auth0 Dashboard](https://manage.auth0.com) or the [Management API](https://auth0.com/docs/api/management/v2).
To configure MRRT with the Auth0 Dashboard:
1. Navigate to **Applications > Applications** and select your application.
2. Under **Multi-Resource Refresh Token**, select **Edit Configuration**.
3. To enable MRRT with the My Account API, toggle on the **My Account API**.
To configure MRRT for a client application, make a `PATCH` request to the `/api/v2/clients/{clientId}` endpoint and add the My Account API identifier and Connected Accounts scopes to the refresh token policies:
```bash lines theme={null}
curl -X PATCH --location "https://${account.namespace}/api/v2/clients/{clientId}" \
-H "Authorization: Bearer " \
-H "Content-Type: application/json" \
-d '{
"is_first_party": true,
"refresh_token": {
"expiration_type": "non-expiring",
"leeway": 0,
"infinite_token_lifetime": true,
"infinite_idle_token_lifetime": true,
"token_lifetime": 31557600,
"idle_token_lifetime": 2592000,
"rotation_type": "non-rotating",
"policies": [
{
"audience": "https://'"$DOMAIN"'/me/",
"scope": [
"create:me:connected_accounts",
"read:me:connected_accounts",
"delete:me:connected_accounts"
]
}
]
}
}'
```
## Configure Connected Accounts
Before configuring Connected Accounts for a connection, make sure you’ve authorized the connection for your client application.
In the Auth0 Dashboard:
1. Navigate to **Authentication > Social Connections** or **Enterprise Connections** and select the connection.
2. Select **Applications** and then toggle on the connection for your client application.
You can configure Connected Accounts with the [Auth0 Dashboard](https://manage.auth0.com) or the [Management API](https://auth0.com/docs/api/management/v2).
To configure Connected Accounts with the Auth0 Dashboard:
1. Navigate to **Authentication > Social Connections** or **Enterprise Connections**.
2. Select **Create Connection** or select an existing connection.
3. In **Purpose**, toggle on **Connected Accounts for Token Vault**. Depending on your **Purpose** setting, you may need to enable `offline_access` in the Auth0 Dashboard, allowing the client application to obtain a refresh token from the external provider during the Connected Accounts flow. To learn more, read [User authentication vs Connected Accounts](#user-authentication-vs-connected-accounts).
4. Click **Save**.
To configure Connected Accounts with the Management API, make a `PATCH` request to the `/connections/{connectionId}` endpoint to set `connected_accounts` to `true`:
```bash lines theme={null}
curl -L -X PATCH "https://{yourDomain}/api/v2/connections/{connectionId}" \
-H 'Content-Type: application/json' \
-H 'Accept: application/json' \
-H "Authorization: Bearer " \
-d '{"connected_accounts":{"active":true}}'
```
## Get access token for Connected Accounts
Before initiating a Connected Accounts request, [get an access token](/docs/manage-users/my-account-api#scope) for the My Account API with the Connected Accounts scopes.
The following sections explain how to use [Multi-Resource Refresh Token (MRRT)](/docs/secure/tokens/refresh-tokens/multi-resource-refresh-token) to get an access token for the My Account API.
### Fetch a refresh token
After [configuring MRRT](#configure-multi-resource-refresh-token) for the client application, initiate the authorization code flow and exchange the resulting authorization code for a refresh token.
The following is an authorization code flow request for a confidential client that includes the `offline_scope` to return a refresh token and a single-use authorization code for the My Account API identifier `https://{yourDomain}/me/`:
```bash lines theme={null}
open "https://{yourDomain}/authorize?client_id=&response_type=code&prompt=login&scope=openid%20profile%20offline_access&redirect_uri=&state=&audience=https://my-example-api.com"
```
Exchange the single-use authorization code for a refresh token at the `/token` endpoint:
```bash lines theme={null}
curl -s --request POST \
--url "https://{yourDomain}/oauth/token" \
--header 'Content-Type: application/json' \
--data-binary @- <",
"client_id": "",
"client_secret": "",
"redirect_uri": ""
}
EOF
```
### Exchange refresh token for My Account API access token
Once you’ve obtained a refresh token, exchange it for a My Account API access token with the Connected Accounts scopes using the refresh token grant type:
```bash lines theme={null}
curl -s -X POST "https://{yourDomain}/oauth/token" \
-H "Content-Type: application/x-www-form-urlencoded" \
--data-urlencode "grant_type=refresh_token" \
--data-urlencode "client_id=" \
--data-urlencode "client_secret=" \
--data-urlencode "refresh_token=" \
--data-urlencode "audience=https://{yourDomain}/me/" \
--data-urlencode "scope=openid profile offline_access create:me:connected_accounts read:me:connected_accounts delete:me:connected_accounts"
```
## Initiate Connected Accounts request
To initiate a Connected Accounts request, make a `POST` request to the My Account API’s `/me/v1/connected-accounts/connect` endpoint with the following parameters:
For a Google social connection, make sure you select `offline_access` in the Auth0 Dashboard when configuring your connection. This is required for your client application to fetch a refresh token from the Auth0 Authorization Server.
| Parameter | Description |
| -------------- | --------------------------------------------------------------------------------------------------------------------------------------------------------------------------------------------------------------------------------------------------------------------------------------------------------------------------------------------------------------------------------------------------------------------- |
| `connection` | Name of connection. For a Google social connection, set to `google-oauth2`. |
| `redirect_uri` | The callback URL of your client application. |
| `state` | A unique, random string associated with the request to prevent attacks. |
| `scopes` | (Optional) The scopes passed to the external provider as an array of strings.
If used to pass scopes for a Google social connection, include `openid` and `profile` at a minimum. At runtime, any scopes included in the `scopes` parameter take precedence over the scopes selected in the Auth0 Dashboard except for `offline_access`, if required by the connection and enabled in the Auth0 Dashboard. |
```bash lines theme={null}
curl --request POST "https://{yourDomain}/me/v1/connected-accounts/connect" \
--header 'Content-Type: application/json' \
--header "Authorization: Bearer " \
--data '{
"connection": "google-oauth2",
"redirect_uri": "",
"state": "",
"scopes": ["openid","profile"] // any scopes passed overwrite the scopes you selected in the Auth0 Dashboard
}'
```
If successful, the My Account API returns a response like the following:
| Parameter | Description |
| ---------------- | ------------------------------------------------------------------------------------------------------------------------------------------------------ |
| `auth_session` | Session ID that represents the current, authenticated session of the primary user. The client application saves the session ID for later verification. |
| `connect_uri` | URL that the client application redirects the user to, which opens up a web browser to handle authorization with the external provider. |
| `connect_params` | Additional parameters necessary for the connect URI. Includes a temporary ticket that the My Account API uses to verify the request. |
| `expires_in` | Expiry time for the session in seconds. |
```json theme={null}
{
"auth_session": "PKM-CYkdx2FyLb4Oob4ED91cSE7i_XJ4SVJByik0xKQxz9CgUZ5JlYr-aMPty0Xr",
"connect_uri": "https://{yourDomain}.us.auth0.com/connect",
"connect_params": {
"ticket": "9375f326-5846-4b57-ae8b-8042573f7c1f"
},
"expires_in": 300
}
```
In the web browser, navigate to the `connect_uri` with the `ticket` as a query parameter. Authorize the list of scopes in the consent screen, then extract and save the `connect_code` in the URL fragment.
```bash lines theme={null}
open https://{yourDomain}.us.auth0.com/connected-accounts/connect?ticket={tickedId}
```
## Complete Connected Accounts request
To complete a Connected Accounts request, make a `POST` request to the `/me/v1/connected-accounts/complete` endpoint with the following parameters:
| Parameter | Description |
| -------------- | ---------------------------------------------------------------------------------------------------------------------------------------------------------------------------------------------------------------- |
| `auth_session` | Session ID that represents the current, authenticated session of the primary user. The client application saves the session ID for later verification. |
| `connect_code` | A single-use, short-lived code received from the authorization process of the external provider. This code is securely exchanged on the server-side to retrieve the final access tokens for the external API. |
| `redirect_uri` | The exact callback URL of your application where the user was sent after successfully authorizing the connection with the external provider. This value must match the `redirect_uri` used to initiate the flow. |
```bash lines theme={null}
curl --location "https://{yourDomain}/me/v1/connected-accounts/complete" \
--header 'Content-Type: application/json' \
--header "Authorization: Bearer " \
--data '{
"auth_session": "",
"connect_code": "",
"redirect_uri": ""
}'
```
If successful, the My Account API returns a response like the following:
| Parameter | Description |
| ------------- | ------------------------------------------------------------------------------------------------------------------------------------------------------------------------------------------------------------------------- |
| `id` | Unique identifier for the connected account. |
| `connection` | Name of the connection. |
| `created_at` | Timestamp of when the connected account was created and linked to the user profile. |
| `scopes` | The specific OAuth scopes (permissions) that the user granted your application access to when connecting to the external provider. These scopes determine what external API actions your application can perform. |
| `access_type` | Indicates the type of access granted. A common value is `offline`, which signifies that a refresh token was successfully obtained and stored, allowing your application to maintain access even when the user is offline. |
```json theme={null}
{
"id": "cac_6ZqSK7Kj1R8LDZJvSb1tAn",
"connection": "google-oauth2",
"created_at": "2025-10-13T21:09:04.126Z",
"scopes": [
"https://www.googleapis.com/auth/calendar",
"https://www.googleapis.com/auth/calendar.addons.execute",
"https://www.googleapis.com/auth/calendar.events",
"https://www.googleapis.com/auth/calendar.events.readonly",
"https://www.googleapis.com/auth/calendar.settings.readonly",
"https://www.googleapis.com/auth/userinfo.profile",
"openid"
],
"access_type": "offline"
}
```
## Manage Connected Accounts
To manage a user’s connected accounts, use the `/me/v1/connected-accounts` collection.
Before using the `/connected-accounts` collection, [get an access token for Connected Accounts](#get-access-token-for-connected-accounts).
### Query connected accounts connections
Make a `GET` request to the `/me/v1/connected-accounts/connections` endpoint to return a list of connections that are linked to the user profile:
```bash lines theme={null}
curl -X GET --location "https://{yourDomain}/me/v1/connected-accounts/connections" \
--header 'Content-Type: application/json' \
--header "Authorization: Bearer "
```
If successful, the My Accounts API returns a response like the following:
```json theme={null}
{
"connections": [
{
"name": "google-oauth2",
"strategy": "google-oauth2",
"scopes": [
"email",
"profile",
"https://www.googleapis.com/auth/calendar",
"https://www.googleapis.com/auth/calendar.events",
"https://www.googleapis.com/auth/calendar.addons.execute",
"https://www.googleapis.com/auth/calendar.events.readonly",
"https://www.googleapis.com/auth/calendar.settings.readonly",
"openid"
]
},
{
"name": "custom",
"strategy": "oauth2",
"scopes": [
"openid"
]
}
]
}
```
### Query connected accounts
Make a `GET` request to the `/me/v1/connected-accounts/accounts` endpoint to return a list of connected accounts linked to the user profile:
```bash lines theme={null}
curl -X GET --location "https://{yourDomain}/me/v1/connected-accounts/accounts" \
--header 'Content-Type: application/json' \
--header "Authorization: Bearer "
```
If successful, the My Accounts API returns a response like the following:
```json theme={null}
{
"accounts": [
{
"id": "cac_6ZqSK7Kj1R8LDZJvSb1tAn",
"connection": "google-oauth2",
"access_type": "offline",
"scopes": [
"https://www.googleapis.com/auth/calendar",
"https://www.googleapis.com/auth/calendar.addons.execute",
"https://www.googleapis.com/auth/calendar.events",
"https://www.googleapis.com/auth/calendar.events.readonly",
"https://www.googleapis.com/auth/calendar.settings.readonly",
"https://www.googleapis.com/auth/userinfo.profile",
"openid"
],
"created_at": "2025-10-13T21:09:04.126Z"
},
{
"id": "cac_fH32E6CWN7HcWZN5w9Vieq",
"connection": "custom",
"access_type": "offline",
"scopes": [
"offline_access",
"openid",
"profile"
],
"created_at": "2025-10-13T18:06:47.216Z"
}
]
}
```
You can also use the Management API to return a list of connected accounts for a user profile by making a `GET` request to the `/users/{userId}/connected-accounts` endpoint:
```bash lines theme={null}
curl -X GET --location "https://{yourDomain}/api/v2/users/{userId}/connected-accounts" \
--header 'Content-Type: application/json' \
--header "Authorization: Bearer "
```
If successful, the Management API returns a response like the following:
```json theme={null}
{
"connected_accounts": [
{
"id": "cac_6ZqSK7Kj1R8LDZJvSb1tAn",
"connection": "google-oauth2",
"connection_id": "con_uBbSbbSpqGqOTvRu",
"strategy": "google-oauth2",
"access_type": "offline",
"scopes": [
"https://www.googleapis.com/auth/calendar",
"https://www.googleapis.com/auth/calendar.addons.execute",
"https://www.googleapis.com/auth/calendar.events",
"https://www.googleapis.com/auth/calendar.events.readonly",
"https://www.googleapis.com/auth/calendar.settings.readonly",
"https://www.googleapis.com/auth/userinfo.profile",
"openid"
],
"created_at": "2025-10-13T21:09:04.126Z"
}
]
}
```
### Query connected accounts for a given connection
Make a `GET` request to the `/me/v1/connected-accounts/accounts` endpoint and pass the connection name as a query parameter to return a list of connected accounts filtered by a given connection linked to a user profile:
```bash lines theme={null}
curl -X GET --location "https://{yourDomain}/me/v1/connected-accounts/accounts?connection={connectionName}" \
--header 'Content-Type: application/json' \
--header "Authorization: Bearer "
```
If successful, the My Accounts API returns a response like the following, filtered for `google-oauth2` connections:
```json theme={null}
{
"accounts": [
{
"id": "cac_6ZqSK7Kj1R8LDZJvSb1tAn",
"connection": "google-oauth2",
"access_type": "offline",
"scopes": [
"https://www.googleapis.com/auth/calendar",
"https://www.googleapis.com/auth/calendar.addons.execute",
"https://www.googleapis.com/auth/calendar.events",
"https://www.googleapis.com/auth/calendar.events.readonly",
"https://www.googleapis.com/auth/calendar.settings.readonly",
"https://www.googleapis.com/auth/userinfo.profile",
"openid"
],
"created_at": "2025-10-13T21:09:04.126Z"
}
]
}
```
### Delete connected account
Make a `DELETE` request to the `/me/v1/connected-accounts/accounts/{connectedAccountId}` endpoint to delete a connected account for a given ID:
```bash lines theme={null}
curl -X DELETE --location "https://{yourDomain}/me/v1/connected-accounts/accounts/{connectedAccountId}" \
--header 'Content-Type: application/json' \
--header "Authorization: Bearer "
```
When you delete a connected account, Auth0 removes the external provider’s access and refresh tokens from the Token Vault. This does not automatically revoke the external provider’s tokens, and the refresh token could still be used to obtain new access tokens. You have to manually revoke the tokens for the external provider if they have been shared or copied elsewhere.
If successful, the My Accounts API returns a response like the following:
```
HTTP/1.1 204 No Content
```