> ## Documentation Index
> Fetch the complete documentation index at: https://auth0.com/llms.txt
> Use this file to discover all available pages before exploring further.
> Describes how to install, configure, and use options for the Auth0 Guardian for Android SDK.
# Guardian for Android SDK
The [Guardian for Android SDK](https://github.com/auth0/Guardian.Android) helps you create Android apps with Guardian functionality, providing secure access to multi-factor authentication (MFA) with push notifications. With this toolkit, you can build your own customized version of the Guardian application that matches the look and feel of your organization. To learn more, read [Configure Push Notifications for MFA](/docs/secure/multi-factor-authentication/multi-factor-authentication-factors/configure-push-notifications-for-mfa#configure-push-notifications-for-apple-using-apn-).
Android API level 15+ is required in order to use the Guardian for Android SDK.
## Install Guardian Android SDK
Guardian is available both in [Maven Central](http://search.maven.org/) and [JCenter](https://bintray.com/auth0/android/guardian).
1. To use Guardian, add these lines to your `build.gradle` dependencies file:
`implementation 'com.auth0.android:guardian:0.4.0'`
You can check for the latest version on the repository [Releases](https://github.com/auth0/GuardianSDK.Android/releases) tab, in [Maven](http://search.maven.org/#search%7Cgav%7C1%7Cg%3A%22com.auth0.android%22%20AND%20a%3A%22guardian%22), or in [JCenter](https://bintray.com/auth0/android/guardian).
2. After adding your Gradle dependency, make sure to sync your project with Gradle file.
### Enable Guardian push notifications
1. Go to [Dashboard > Security > Multifactor Auth > Push via Auth0 Guardian.](https://manage.auth0.com/#/security/mfa/guardian)
2. Toggle the switch at the top to enable it.
 3. [Configure push notifications](/docs/secure/multi-factor-authentication/multi-factor-authentication-factors/configure-push-notifications-for-mfa#configure-push-notifications-for-android-using-fcm).
## Use SDK
Guardian is the core of the SDK. You'll need to create an instance of this class for your specific tenant URL.
```java lines theme={null}
Uri url = Uri.parse("https://..auth0.com");
Guardian guardian = new Guardian.Builder()
.url(url)
.build();
```
or
```java lines theme={null}
String domain = "..auth0.com";
Guardian guardian = new Guardian.Builder()
.domain(domain)
.build();
```
### Enroll
The link between the second factor (an instance of your app on a device) and an Auth0 account is referred to as an **enrollment**.
You can create an enrollment using the `Guardian.enroll` function, but first, you'll have to create a new pair of RSA keys for it. The private key will be used to sign the requests to allow or reject a login. The public key will be sent during the enrollment process so the server can later verify the request's signature.
```java lines theme={null}
KeyPairGenerator keyPairGenerator = KeyPairGenerator.getInstance("RSA");
keyPairGenerator.initialize(2048); // you MUST use at least 2048 bit keys
KeyPair keyPair = keyPairGenerator.generateKeyPair();
```
Next, obtain the enrollment information by scanning the Guardian QR code, and use it to enroll the account:
```java lines theme={null}
Uri enrollmentUriFromQr = ...; // the URI obtained from a Guardian QR code
CurrentDevice device = new CurrentDevice(context, "fcmToken", "deviceName");
Enrollment enrollment = guardian
.enroll(enrollmentUriFromQr, device, keyPair)
.execute();
```
Alternatively, you can execute the request in a background thread:
```java lines theme={null}
guardian
.enroll(enrollmentUriFromQr, device, keyPair)
.start(new Callback {
@Override
void onSuccess(Enrollment enrollment) {
// we have the enrollment data
}
@Override
void onFailure(Throwable exception) {
// something failed
}
});
```
You must provide the following data:
| Variable | Description |
| ------------ | --------------------------------------------------------------------------------------------------------------------------------------------------------------------------------------- |
| `deviceName` | Name for the enrollment displayed to the user when the second factor is required. |
| `fcmToken` | Token for Firebase Cloud Messaging (FCM) push notification service. See [Sample Register](https://firebase.google.com/docs/cloud-messaging/android/client#sample-register) for details. |
### Unenroll
To disable MFA, you can delete the enrollment:
```java lines theme={null}
guardian
.delete(enrollment)
.execute(); // or start(new Callback<> ...)
```
### Allow login requests
Once you have the enrollment in place, you'll receive a FCM push notification every time the user needs multi-factor authentication.
Guardian provides a method to parse the `Map` data inside the [RemoteMessage](https://firebase.google.com/docs/reference/android/com/google/firebase/messaging/RemoteMessage) received from FCM and return a `Notification` instance ready to be used.
```javascript lines theme={null}
// at the FCM listener you receive a RemoteMessage
@Override
public void onMessageReceived(RemoteMessage message) {
Notification notification = Guardian.parseNotification(message.getData());
if (notification != null) {
// you received a Guardian notification, handle it
handleGuardianNotification(notification);
return;
}
/* handle other push notifications you might be using ... */
}
```
Once you have the notification instance, you can use the `allow` method to approve the authentication request. You'll also need the enrollment that you obtained previously. If there are multiple enrollments, be sure to use the one that has the same `id` as the notification (the `enrollmentId` property).
```java lines theme={null}
guardian
.allow(notification, enrollment)
.execute(); // or start(new Callback<> ...)
```
### Reject login requests
To deny an authentication request, use `reject` instead. You can also add an optional reason for the rejection, which will be available in the guardian logs.
```java lines theme={null}
guardian
.reject(notification, enrollment) // or reject(notification, enrollment, reason)
.execute(); // or start(new Callback<> ...)
```
### Set up mobile-only OTP enrollment
You can enable one-time passwords (OTP) as an MFA factor using the Auth0 Dashboard or Management API. This option does not require a QR code and allows users to enroll manually.
To invite a user to enroll, navigate to the [Auth0 Dashboard > User Management > Users](https://manage.auth0.com/#/users) and select a user. Then, access their Details tab and use the Multi-Factor Authentication section to send an enrollment invitation.
#### Connect a resource
You can connect a resource using the Auth0 Dashboard or the Guardian SDK.
##### Use Auth0 Dashboard
1. Access the Auth0 login prompt and copy the provided code or a similar base32 encoded key obtained from another source.
3. [Configure push notifications](/docs/secure/multi-factor-authentication/multi-factor-authentication-factors/configure-push-notifications-for-mfa#configure-push-notifications-for-android-using-fcm).
## Use SDK
Guardian is the core of the SDK. You'll need to create an instance of this class for your specific tenant URL.
```java lines theme={null}
Uri url = Uri.parse("https://..auth0.com");
Guardian guardian = new Guardian.Builder()
.url(url)
.build();
```
or
```java lines theme={null}
String domain = "..auth0.com";
Guardian guardian = new Guardian.Builder()
.domain(domain)
.build();
```
### Enroll
The link between the second factor (an instance of your app on a device) and an Auth0 account is referred to as an **enrollment**.
You can create an enrollment using the `Guardian.enroll` function, but first, you'll have to create a new pair of RSA keys for it. The private key will be used to sign the requests to allow or reject a login. The public key will be sent during the enrollment process so the server can later verify the request's signature.
```java lines theme={null}
KeyPairGenerator keyPairGenerator = KeyPairGenerator.getInstance("RSA");
keyPairGenerator.initialize(2048); // you MUST use at least 2048 bit keys
KeyPair keyPair = keyPairGenerator.generateKeyPair();
```
Next, obtain the enrollment information by scanning the Guardian QR code, and use it to enroll the account:
```java lines theme={null}
Uri enrollmentUriFromQr = ...; // the URI obtained from a Guardian QR code
CurrentDevice device = new CurrentDevice(context, "fcmToken", "deviceName");
Enrollment enrollment = guardian
.enroll(enrollmentUriFromQr, device, keyPair)
.execute();
```
Alternatively, you can execute the request in a background thread:
```java lines theme={null}
guardian
.enroll(enrollmentUriFromQr, device, keyPair)
.start(new Callback {
@Override
void onSuccess(Enrollment enrollment) {
// we have the enrollment data
}
@Override
void onFailure(Throwable exception) {
// something failed
}
});
```
You must provide the following data:
| Variable | Description |
| ------------ | --------------------------------------------------------------------------------------------------------------------------------------------------------------------------------------- |
| `deviceName` | Name for the enrollment displayed to the user when the second factor is required. |
| `fcmToken` | Token for Firebase Cloud Messaging (FCM) push notification service. See [Sample Register](https://firebase.google.com/docs/cloud-messaging/android/client#sample-register) for details. |
### Unenroll
To disable MFA, you can delete the enrollment:
```java lines theme={null}
guardian
.delete(enrollment)
.execute(); // or start(new Callback<> ...)
```
### Allow login requests
Once you have the enrollment in place, you'll receive a FCM push notification every time the user needs multi-factor authentication.
Guardian provides a method to parse the `Map` data inside the [RemoteMessage](https://firebase.google.com/docs/reference/android/com/google/firebase/messaging/RemoteMessage) received from FCM and return a `Notification` instance ready to be used.
```javascript lines theme={null}
// at the FCM listener you receive a RemoteMessage
@Override
public void onMessageReceived(RemoteMessage message) {
Notification notification = Guardian.parseNotification(message.getData());
if (notification != null) {
// you received a Guardian notification, handle it
handleGuardianNotification(notification);
return;
}
/* handle other push notifications you might be using ... */
}
```
Once you have the notification instance, you can use the `allow` method to approve the authentication request. You'll also need the enrollment that you obtained previously. If there are multiple enrollments, be sure to use the one that has the same `id` as the notification (the `enrollmentId` property).
```java lines theme={null}
guardian
.allow(notification, enrollment)
.execute(); // or start(new Callback<> ...)
```
### Reject login requests
To deny an authentication request, use `reject` instead. You can also add an optional reason for the rejection, which will be available in the guardian logs.
```java lines theme={null}
guardian
.reject(notification, enrollment) // or reject(notification, enrollment, reason)
.execute(); // or start(new Callback<> ...)
```
### Set up mobile-only OTP enrollment
You can enable one-time passwords (OTP) as an MFA factor using the Auth0 Dashboard or Management API. This option does not require a QR code and allows users to enroll manually.
To invite a user to enroll, navigate to the [Auth0 Dashboard > User Management > Users](https://manage.auth0.com/#/users) and select a user. Then, access their Details tab and use the Multi-Factor Authentication section to send an enrollment invitation.
#### Connect a resource
You can connect a resource using the Auth0 Dashboard or the Guardian SDK.
##### Use Auth0 Dashboard
1. Access the Auth0 login prompt and copy the provided code or a similar base32 encoded key obtained from another source.
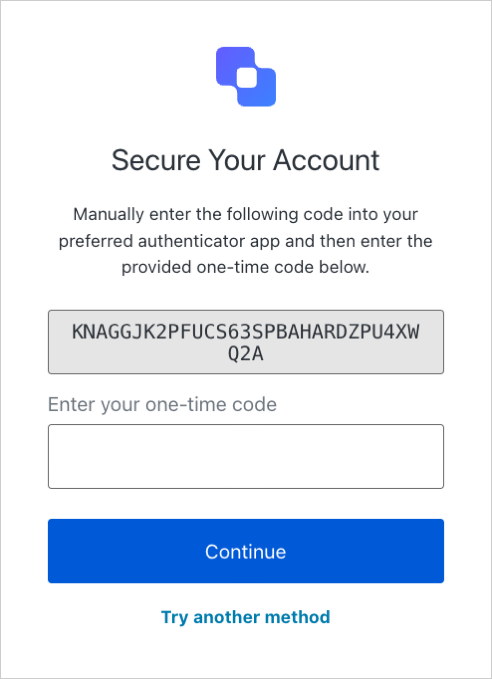 2. After obtaining your code, add it to the Guardian SDK:
**Java**
`public String copiedCode = "{copiedCode}";`
**Kotlin**
`val copiedCode: String = "{copiedCode}"`
##### Use Guardian SDK
First, add the `LoginCodeGenerator` class to your project. Then, use `getCode (String copiedCode) to` generate a one-time code in your app.
**Java**
```java lines expandable theme={null}
public class LoginCodeGenerator {
private static final int TOTP_LENGTH = 6;
private static final int TOTP_DURATION = 30;
private static final String TOTP_ALGORITHM = "SHA1";
public String getCode(String copedCode) {
byte[] key = new byte[0];
try {
key = Base32.decode(copedCode);
} catch (Base32.DecodingException ex) {
// handle exception
}
TOTP totp = new TOTP(TOTP_ALGORITHM, key, TOTP_LENGTH, TOTP_DURATION);
return totp.generate();
}
}
```
**Kotlin**
```kotlin lines expandable theme={null}
class LoginCodeGenerator {
fun getCode(copiedCode: String): String {
var key: ByteArray? = ByteArray(0)
try {
key = Base32.decode(copiedCode)
} catch (ex: Base32.DecodingException) {
// handle exception
}
val totp = TOTP(TOTP_ALGORITHM, key, TOTP_LENGTH, TOTP_DURATION)
return totp.generate()
}
companion object {
private const val TOTP_LENGTH = 6
private const val TOTP_DURATION = 30
private const val TOTP_ALGORITHM = "SHA1"
}
}
```
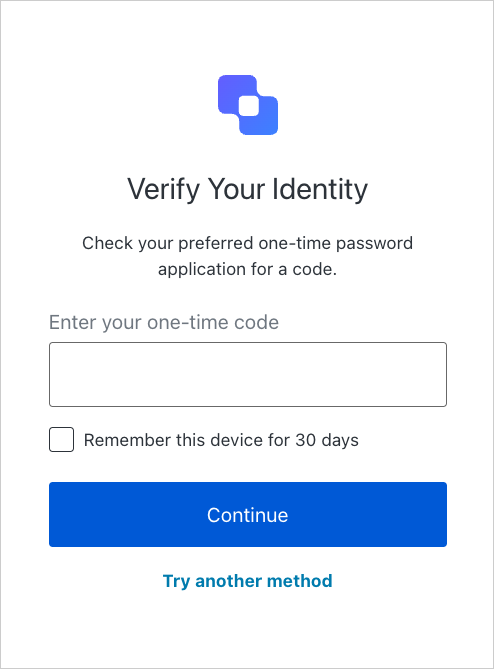
#### Enter one-time code
Enter the generated one-time password from `getCode()` into the Auth0 login prompt.
After selecting Continue, a message displays stating your application has been added as an authentication factor for your user.
#### Log in with your app
After the factor has been enrolled, your user can log in using your app. First, choose the Guardian app as your authentication method.
2. After obtaining your code, add it to the Guardian SDK:
**Java**
`public String copiedCode = "{copiedCode}";`
**Kotlin**
`val copiedCode: String = "{copiedCode}"`
##### Use Guardian SDK
First, add the `LoginCodeGenerator` class to your project. Then, use `getCode (String copiedCode) to` generate a one-time code in your app.
**Java**
```java lines expandable theme={null}
public class LoginCodeGenerator {
private static final int TOTP_LENGTH = 6;
private static final int TOTP_DURATION = 30;
private static final String TOTP_ALGORITHM = "SHA1";
public String getCode(String copedCode) {
byte[] key = new byte[0];
try {
key = Base32.decode(copedCode);
} catch (Base32.DecodingException ex) {
// handle exception
}
TOTP totp = new TOTP(TOTP_ALGORITHM, key, TOTP_LENGTH, TOTP_DURATION);
return totp.generate();
}
}
```
**Kotlin**
```kotlin lines expandable theme={null}
class LoginCodeGenerator {
fun getCode(copiedCode: String): String {
var key: ByteArray? = ByteArray(0)
try {
key = Base32.decode(copiedCode)
} catch (ex: Base32.DecodingException) {
// handle exception
}
val totp = TOTP(TOTP_ALGORITHM, key, TOTP_LENGTH, TOTP_DURATION)
return totp.generate()
}
companion object {
private const val TOTP_LENGTH = 6
private const val TOTP_DURATION = 30
private const val TOTP_ALGORITHM = "SHA1"
}
}
```
#### Enter one-time code
Enter the generated one-time password from `getCode()` into the Auth0 login prompt.
After selecting Continue, a message displays stating your application has been added as an authentication factor for your user.
#### Log in with your app
After the factor has been enrolled, your user can log in using your app. First, choose the Guardian app as your authentication method.
 To generate the one-time code, call `getCode(copedCode: String)` using the code you copied from the Auth0 login prompt.
Then, enter the one-time code into the login prompt to verify your identity.
To generate the one-time code, call `getCode(copedCode: String)` using the code you copied from the Auth0 login prompt.
Then, enter the one-time code into the login prompt to verify your identity.
 ## Learn more
* [Configure Push Notifications for MFA](/docs/secure/multi-factor-authentication/multi-factor-authentication-factors/configure-push-notifications-for-mfa)
## Learn more
* [Configure Push Notifications for MFA](/docs/secure/multi-factor-authentication/multi-factor-authentication-factors/configure-push-notifications-for-mfa)